Second gun, trial and success (upgraded! AGAIN)

Boom! The classic potato gun harnesses the combustion of flammable vapor. Show us your combustion spud gun and discuss fuels, ratios, safety, ignition systems, tools, and more.
User avatar
daxspudder
Specialist 3
Specialist 3
Posts: 300
Joined: Thu Apr 24, 2008 10:22 pm

Tue Apr 29, 2008 9:20 pm

So my first gun was quite alright, but after thinking it over, i have 5 screws in a single plane of the chamber, which makes me a little afraid to use it as that creates a point for rupture.

NOTE:regardless of what it looks like, the ratios are based on 8th grade math, if you want my formulas, they are (c1Rsqr*pi*c1l)+(c2Rsqr*pi*c2l):(bRsqr*pi*bl) where b is barrel, and c1 is the forward portion of chamber, c2 is the larger aft portion of chamber, as you can see by the math the ratios are based on cubic inches... Rsqr is radius squared.

DIMENSIONS: B24"Lx2"W C6"Lx3"W+12"Lx4"W C:B 1.38:1
Made with pressure rated Water supply ABS rigid core, rated to over 180psi, cost a good little bit, and nearly ruined tungsten carbide dremel bits(there is no black paint on it) dwv nazis back off


EDIT: I now have several barrels that can be swapped out, a longer 2"(I have a 10' piece im gonna cut either 6'/4' or 3'/7'), the original, and a 1.5"x2'

In this new design improvements include: larger chamber; all wiring hidden (i used a dremel to cut a grove in one of the coupling edges and sealed the wire in); a 1 inch piece of 1.5 inch pipe attached at 4 points in the aft end of the barrel to aid in barrel stuffing; new grip design; forward grip uses finger adjustable tabs to allow for side handle reconfigurations; all screws/penetrations are in couplings to give better structural integrity; a piezo-electric trigger built into the handle which is actually small enough to hold. ohh and the report is way louder due to the the new 1.38:1 C:B ratio, no reduced accuracy either :lol:

NEW AMMO! 2" fish bobbers with the trim shaved (dremel) and filled with anything sealed off with electrical tape. I used tempura paint, sand, or lead weights. there is also some cool stuff you can do with them, but thanks to a very helpful person, ive since removed that information :twisted: and the bobbers do not split until impact, filling them with paint makes basketball size or larger marks on anything it hits, like a jumbo paint ball, i do however completely wrap them in electrical tape, two layers leaves less than 1/64" of space all around so the tight fit gives a perfect shot, also i have a ramming rod with a foam ball on the end, i cover it with vasaline, and like gay porn it relieves all friction allowing for just enough back pressure as well as extraordinary side seal, leaving a tape streamer removes the aerial beach ball effect by creating a little drag which allows long distance shots, ive never hit a target larger than a basketball from more than 130' which is an easy hit as i achieve a good high velocity.

EDIT: beginning to add components for measured propane, starting with the fan. I spent about 25$US at radio shack, on the fan, light up switch, and 12v(8AA) battery pack. I also added a male threaded piece to the old barrel, with just enough clearance to still attach the forward handle, i have also made a new barrel which is 1 1/2"x2' barrel (I will make a longer one, as this makes my C:B almost 5:1) and of course i attached a coupling to the original barrel.

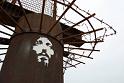
assembly: the battery pack fits neatly away inside the front handle, and the switch is cleanly installed in an easy to flick position in the "trigger" spot of the forward handle. the batteries are easily removed via a 9v connector. the fan will sit directly behind the spark gap, and the wiring has eyelets on both the fan and switch ends, which allows me to attach them with a bolt threaded through the chambers aft coupling... this also allows easy removal. I thought i was just buying a regular fan, but it has LEDs(see pic) which I think will light up the smoke as i clears the chamber... just a nice perk

the propane metering system is being built now!
Attachments
lining up the shot
lining up the shot
the new ammo, unfinished of course!
that tree is about 2 feet in diameter, sorry for the branches, it was raining when i took the shot and i didnt want to get my camera wet, and i would have to jump a fence to avoid the branches
posing in the bunker on my back porch
i used the same skull stencil, i like it better on the barrel
the contacts, and the chambers over-insertion guard
the holder for the 8AA batteries, held in place with one screw, the battery holder attaches/detaches by the same connector as a 9v
a better look of the forward handle/fan setup
I also added couplings for attachment of different barrels, ive only added one new one, a 1 1/2"x2' barrel, and the original barrel as well
begining to add components for the measured propane, this is the fan, with the light up switch built into the forward handle, the 8 AA batteries are tucked neatly away in the handle as well
Last edited by daxspudder on Sat Jul 05, 2008 2:19 pm, edited 11 times in total.
the cats in the bag
Private 2
Private 2
Posts: 33
Joined: Tue Mar 04, 2008 9:32 pm

Tue Apr 29, 2008 9:34 pm

Nice gun, like the paint job alot :D .Sweet amo too nothing like a little homeade pyro technics. :twisted:
OuchProgramme
Specialist 3
Specialist 3
Posts: 371
Joined: Sat Jan 12, 2008 7:30 pm

Tue Apr 29, 2008 10:30 pm

Read the rules buddy.
Discussion of solid propellants, explosive devices or incendiary projectiles fired specifically from a spud cannon is prohibited, and may result in a permanent banning of your account.

Interesting ammo though.

Does the fishing bob split when fired?
Last edited by OuchProgramme on Tue Apr 29, 2008 11:54 pm, edited 1 time in total.
User avatar
starman
Sergeant Major
Sergeant Major
United States of America
Posts: 3027
Joined: Wed Dec 12, 2007 12:45 am
Location: Simpsonville, SC

Donating Members

Tue Apr 29, 2008 11:11 pm

Pretty nifty combustion you have there. You've done a good job on some build details. Even though the paint job was a little half hearted, it actually works in a sort-of artsy way.

You could help out your performance with a longer barrel, you would of course sacrifice portability some.

Also the DWV police here will eventually have something to add regarding your design.... :roll:

Welcome to Spudfiles! Nice effort overall. You obviously did some homework before building it.
User avatar
bigbob12345
Staff Sergeant
Staff Sergeant
Posts: 1516
Joined: Sat Dec 01, 2007 9:13 am
Location: Mercer Island,Washington

Tue Apr 29, 2008 11:18 pm

You got DWV which isnt complete suicide on a spray and pray but use pressure rated parts next time. But other than that its pretty nice.
and the ratio looks larger than 1.38:1, looks more like 4:1

Edit: :lol: starman i think you can see the future, I guess your post was submitted while i was writing mine
User avatar
daxspudder
Specialist 3
Specialist 3
Posts: 300
Joined: Thu Apr 24, 2008 10:22 pm

Tue Apr 29, 2008 11:24 pm

thank you, honestly, i did very little homework, other than material research. i really try to use common sense when i build, i was halfway through with my first when i realized the flawed design and the risk of parting at the multiple entry points. i also sanded all joints that i applied cement to to roughen them up so a better bond may be made, soon all add a pic of some of the finer points, like the 12/6 oclock ignition points, as well as the inner barrel guard, and the paint job looks awesome in real life, the photos don do it justice, there are some amazing little marbled details to it that just look crappy in photo...
User avatar
starman
Sergeant Major
Sergeant Major
United States of America
Posts: 3027
Joined: Wed Dec 12, 2007 12:45 am
Location: Simpsonville, SC

Donating Members

Tue Apr 29, 2008 11:28 pm

bigbob12345 wrote:You got DWV which isnt complete suicide on a spray and pray but use pressure rated parts next time. But other than that its pretty nice.
and the ratio looks larger than 1.38:1, looks more like 4:1

Edit: :lol: starman i think you can see the future, I guess your post was submitted while i was writing mine
Indeed BigBob.. :lol: What would we do without you... :wink:
User avatar
bigbob12345
Staff Sergeant
Staff Sergeant
Posts: 1516
Joined: Sat Dec 01, 2007 9:13 am
Location: Mercer Island,Washington

Wed Apr 30, 2008 7:58 am

I guess I am the unofficial DWV police now, maybe I should ask pcguy to change my name to the DWV police :lol:
Last edited by bigbob12345 on Fri May 16, 2008 7:54 am, edited 1 time in total.
THUNDERLORD
Sergeant 3
Sergeant 3
Posts: 1264
Joined: Fri Mar 28, 2008 1:42 pm

Wed Apr 30, 2008 9:16 am

Looks like a fun combustion. Cool paint job too.
If you keep shooting that tree it's gonna be polka dotted!!!
Just wondered what you're going to name it? 8)
User avatar
Boom_erang
Private 4
Private 4
Posts: 61
Joined: Fri Apr 25, 2008 2:26 pm

Wed Apr 30, 2008 10:07 am

I like the form factor and I wish mine were as portable (that will be the next one). I agree with bigbob that the C:B ratio looks more like 3:1 or maybe more... I would guess it makes a pretty big bang, like you said. Love the fishing bobber ammo idea! Nice handle placement, too.
User avatar
daxspudder
Specialist 3
Specialist 3
Posts: 300
Joined: Thu Apr 24, 2008 10:22 pm

Tue May 06, 2008 2:08 pm

using d_hall's program, it warns my barrel is too long, so if it were 3:1 i somehow doubt that result would come about...
User avatar
spudmatic
Private 2
Private 2
Posts: 32
Joined: Fri Apr 11, 2008 5:11 pm

Sun May 11, 2008 6:03 pm

Nice job man, some good progress for a second cannon. Any plans to go bigger with more sparks and propane?
User avatar
daxspudder
Specialist 3
Specialist 3
Posts: 300
Joined: Thu Apr 24, 2008 10:22 pm

Wed May 14, 2008 9:19 pm

I'm actually planning on chopping the barrel about 3 inches from the reducer, and connecting a female threaded piece. then having several interchangeable barrels. i have also found a source for 1 3/4" propane tanks for camp gear, which i think will be much more aesthetically pleasing to have mounted on the chamber, and with a measuring system as well. no plans for more sparks, but Im strongly considering a chamber fan, i want to keep the design as simple as possible, and having more sparks will require a more complicated triggering system, and i like my simple push button igniter, it gets the job done and doesn't require batteries :o
User avatar
daxspudder
Specialist 3
Specialist 3
Posts: 300
Joined: Thu Apr 24, 2008 10:22 pm

Fri May 16, 2008 1:00 am

well sorry forum police for double posting, but I wanted to draw some attention to the new features ive added, to hopefully get some feedback/suggestions, and to add that my thought yesterday (last post) has mostly been implemented, just propane system to add now, gonna need a separate chamber just to get a good 4% mix, otherwise ill have to have a ton of piping... what if i thread metal fittings into some better rated PVC, then going back to metal to thread into the chamber?
User avatar
Blitz
Corporal 2
Corporal 2
United States of America
Posts: 627
Joined: Sat Apr 07, 2007 1:48 am
Location: Illinois
Been thanked: 3 times

Fri May 16, 2008 7:47 am

That was very informative, nice :)

I like the paintjob too.
Post Reply