I am excited to see the end product and damage pics!!
update 11/07: TOW tube launcher is done, success!
You can do what many users do here and create a photobucket account and then upload them to photobucket. The copy and paste the image code here and thats it!!  ]
]
I am excited to see the end product and damage pics!! Lol
Lol 
I am excited to see the end product and damage pics!!
4SPC, My 4" piston 3" porting cannon
Memo:
Fix up copper cannon
Fix up 4SPC
Start Stirrup pump
Start Toolies piston bazooka
Memo:
Fix up copper cannon
Fix up 4SPC
Start Stirrup pump
Start Toolies piston bazooka
-
frankrede

- Sergeant Major 2

- Posts: 3220
- Joined: Thu Jul 20, 2006 9:47 pm
- Has thanked: 1 time
- Been thanked: 1 time
Have you used the sprinkler adapters?jimmy101 wrote:The "valves" on the soda bottle tshirt guns aren't actually "valves".
Well, I guess one is, the greenish thing is a standard sprinkler valve that has been mod'd to be operated by a blowgun trigger. The black cover on the sprinkler valve, that the blowgun is screwed into, is a custom replacement part manufactured by DR (?) on the SpudCom site.
The black tube between the bottle and the valve is a custom adaptor (DR again) that has a "soda bottle thread" on one end and the suitable thread for the sprinkler valve on the other end (there may be a threaded nipple between the adaptor and the valve). This adaptor also has a tapped hole for the pressure gauge, and another for a Schrader valve (both 1/4 NPT?) to fill the chamber.
The bottle adaptor is a really cool piece. They are supposed to be for sale on the SpudCom site but last I checked they weren't available yet.
The custom plate for the valve is pretty cool to but I believe there is a limited selection available. Maybe the same as the valve your local hardware store has, maybe not. In any case, it is pretty straight forward to do the blowgun mod of a sprinkler valve.
The clear PVC barrel and the clear soda bottle chamber really make this gun look cool. To bad the clear PVC is soooo $$$$$$. Heck, you can even get clear PVC fittings if you pockets are deep enough.
They are awesome, as are the soda bottle adapters,
the soda bottle adapters, on mine at least are all 1/8" npt
Current project: Afghanistan deployment

Ok, here's my attempt at photos, these are all from the build, I will post photos of the final product when I get a chance a few days from now:
The tube; note the tube sticking out of the side, which I made the bottom, so the blowgun valve and handle would attach there...

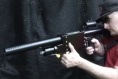
Barrel assembly:

Unfortunately, this sticks out about 6" from the nose end...the reducers and valve simply took up too much length in the tube.
Chamber Assembly:

Not pictured: modified sprinkler valve, and final assembly.
Notes:
It might be possible to make a barrel sealing design from this tube, but as noted, there is a big hole in the side which would have to be sealed up. The parts which were there did provide some kind of closure, but I doubt they would have held up under pressure....
Also, with the sprinkler valve centered in the tube, clearance between the tube wall and pipe nipple I epoxied in place of the solenoid was CLOSE, as in, I had to chop the pipe nipple down a lot to prevent a kink in my air line...would have been far better to have the pipe nipple sideways instead of simply in place of the solenoid.
I also would have routed the gauge somewhere other than the rear end; as it is, the tank-filler-guy has to crouch down and read upside down to know when to stop, as the cannon-holding-guy has it angled up (tail end low) when shouldered. I had enough tube, but it would be a pain to slide the whole assembly in with the gauge in front of the firer or something--it was a big enough pain getting the blowgun air line in ahead of everything.
As noted the tank will not fit in the tube with the other parts at the moment...if I did it again with more time and money I would have used a larger diameter pipe for the chamber, to make the OAL shorter....but that would also require different fittings, so I am not sure it would have been possible to see a reduction in length in any case.
And, the thing needs a proper shoulder stock and vertical fore-grip...the current handle is simply friction-fit so I can take things apart for repairs, but it makes holding and carrying awkward. I would get some accessories from Tapco if we had money in the budget.
Also, this thing is HEAVY; I would guess 20lbs all up....low recoil though.
The tube; note the tube sticking out of the side, which I made the bottom, so the blowgun valve and handle would attach there...
Barrel assembly:
Unfortunately, this sticks out about 6" from the nose end...the reducers and valve simply took up too much length in the tube.
Chamber Assembly:
Not pictured: modified sprinkler valve, and final assembly.
Notes:
It might be possible to make a barrel sealing design from this tube, but as noted, there is a big hole in the side which would have to be sealed up. The parts which were there did provide some kind of closure, but I doubt they would have held up under pressure....
Also, with the sprinkler valve centered in the tube, clearance between the tube wall and pipe nipple I epoxied in place of the solenoid was CLOSE, as in, I had to chop the pipe nipple down a lot to prevent a kink in my air line...would have been far better to have the pipe nipple sideways instead of simply in place of the solenoid.
I also would have routed the gauge somewhere other than the rear end; as it is, the tank-filler-guy has to crouch down and read upside down to know when to stop, as the cannon-holding-guy has it angled up (tail end low) when shouldered. I had enough tube, but it would be a pain to slide the whole assembly in with the gauge in front of the firer or something--it was a big enough pain getting the blowgun air line in ahead of everything.
As noted the tank will not fit in the tube with the other parts at the moment...if I did it again with more time and money I would have used a larger diameter pipe for the chamber, to make the OAL shorter....but that would also require different fittings, so I am not sure it would have been possible to see a reduction in length in any case.
And, the thing needs a proper shoulder stock and vertical fore-grip...the current handle is simply friction-fit so I can take things apart for repairs, but it makes holding and carrying awkward. I would get some accessories from Tapco if we had money in the budget.
Also, this thing is HEAVY; I would guess 20lbs all up....low recoil though.
Last edited by GTLandser on Wed Nov 14, 2007 8:16 pm, edited 4 times in total.
-
Pete Zaria
- Corporal 5

- Posts: 954
- Joined: Fri Mar 31, 2006 6:04 pm
- Location: Near Seattle, WA
That 4"-2" reducer is DWV and should not be used over ~60 PSI, FYI.
Nice work, looks very cleanly finished.
Peace,
Pete Zaria.
Nice work, looks very cleanly finished.
Peace,
Pete Zaria.
-
ShowNoMercy

- Sergeant

- Posts: 1094
- Joined: Mon Mar 19, 2007 8:08 am
- Location: Jersey Bitches!
The valve is modded I assume? And if isnt mod it, and then if it is, change that reducer and crank up the pressure?
Jesus saves, no need to pray
The gates of pearl have turned to gold
It seems you've lost your way
The gates of pearl have turned to gold
It seems you've lost your way
Possibly a bigger valve, such as a 2 inch modded sprinkler valve. You'll see alot better performance with one of those.
4SPC, My 4" piston 3" porting cannon
Memo:
Fix up copper cannon
Fix up 4SPC
Start Stirrup pump
Start Toolies piston bazooka
Memo:
Fix up copper cannon
Fix up 4SPC
Start Stirrup pump
Start Toolies piston bazooka
-
goathunter
- Corporal 2

- Posts: 675
- Joined: Thu Feb 15, 2007 9:20 pm
If you want better range you will have to lengthen the barrel.I know it goes against the GGDT but by far my best guns have had barrels over the 12 in. mark(probably not what you wanted to hear).Generally I shoot for a 1.5:1 chamber to barrel ratio.
A trick I do when finding the most suitable barrel length on a gun is build 6" longer than you are willing to deal with then fire test shots cutting it down 1" at a time until you reach the point were the range gets worse then build a new barrel the size of your last measurement.
Also,use bushings for the barrel and chamber you'll knock off a good inch from the difference of the bushings to the existing reducers.And it won't hurt to build a smaller chamber either.
"Some people wonder all their lives if they've made a difference. The Marines don't have that problem"-Ronald Reagan
"KA BLAAM! Elimination! Lack of education."-Big Mama, Fox and the Hound, Disney
"KA BLAAM! Elimination! Lack of education."-Big Mama, Fox and the Hound, Disney


I back goathunter here.
I like a barrel a good 3 to 5 feet for a good launcher. A small low powered one might get a 12" barrel, but that's far less than I like.
I aim for a ratio between 1:1 and 2:1 - beyond 2:1 efficiency takes a major nose dive, lower than 1:1 and velocity takes a hit.
However, bushings, as well as coming in a pressure rated variety are shorter. If you could shrink the gaps a little, and use a shorter chamber, but longer barrel you could easily see big power boosts.
Does that thing kinda look like a big cat to you?
Create an account or sign in to join the discussion
You need to be a member in order to post a reply
Create an account
Not a member? register to join our community
Members can start their own topics & subscribe to topics
It’s free and only takes a minute
Sign in
-
- Similar Topics
- Replies
- Views
- Last post
-
- 12 Replies
- 11153 Views
-
Last post by GonzoInferno
-
- 32 Replies
- 14179 Views
-
Last post by chinnerz
-
- 19 Replies
- 9005 Views
-
Last post by starman
-
- 35 Replies
- 21606 Views
-
Last post by Technician1002
-
- 6 Replies
- 5074 Views
-
Last post by inonickname