ongoing progress update pictures (small video added)


Well for that big of a hole/indent into a 2x4 with a marble is pretty freaking good. I can't wait to see what a lead ball does. very good job, I have been following this gun since it's inception. keep up the posting/updating and I love all the picture cause my imagination sucks.
<a href="">DONT TAZE ME BRO.. DONT TAZE ME... AHHHH</a>Yea, that's definitely going to get you at least a tazer.
facebook.com/biggrib
-
lockmanslammin

- Specialist

- Posts: 152
- Joined: Sun Feb 10, 2008 3:22 pm
- Location: Sioux Falls, South Dakota
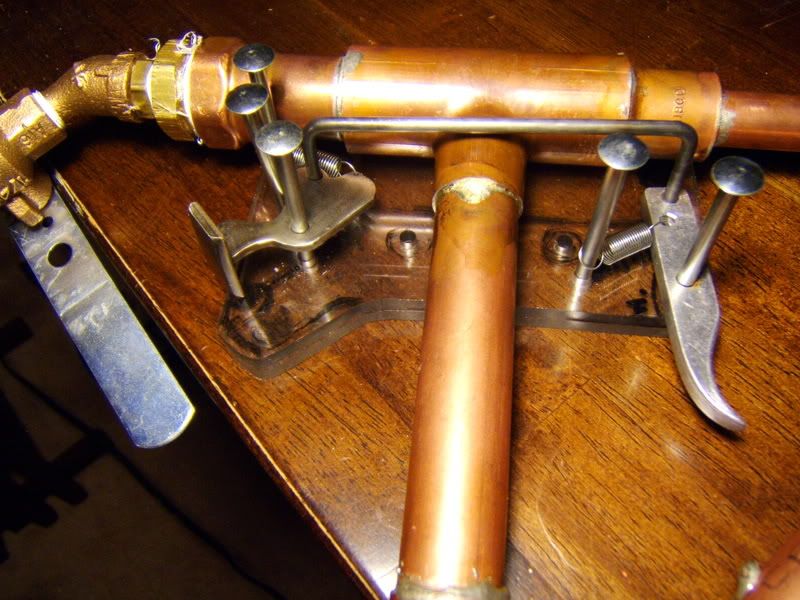
Alright, I got some time at work tonight to use some of the equipment I needed to get the trigger and sear assembly started and got quite a bit done. The trigger itself is made out of 1/4" aluminum, the connecting rod is made out of music wire (real hard steal) and the sear is some 1/8" stainless bar stock welded together and shaped with an angle grinder. All of the pins you see will be drilled and fitted with clips for easy diss-assembly. I'm pretty sure I have it figured out how I will attach it to the cannon, but I will wait until I have it done to take a pic and explain it. There will be a little bit more machining to make the piece that will be the other side of the sear and be threaded and screwed to the ball valve handle. I plan on having the holes slotted for adjustability and precision alignment so it works with the sear perfectly. This baby will have a hair trigger, I was just thinking tonight I need to add some sort of a safety lever to the assembly some where. Anyhow, here is a couple pics of it so far. When it is all assembled there will be a frame piece on both sides, I put them both on the bottom for the pics, so it would be easier to see.
By the way, thanx jsr, biggrip and everyone else, I do appreciate the replies and opinions, this forum, and the people in it,are a large part of what makes this project fun.
Lock


By the way, thanx jsr, biggrip and everyone else, I do appreciate the replies and opinions, this forum, and the people in it,are a large part of what makes this project fun.
Lock
Last edited by lockmanslammin on Sun Oct 05, 2014 10:38 am, edited 1 time in total.
-
lockmanslammin
- Specialist
- Posts: 152
- Joined: Sun Feb 10, 2008 3:22 pm
- Location: Sioux Falls, South Dakota
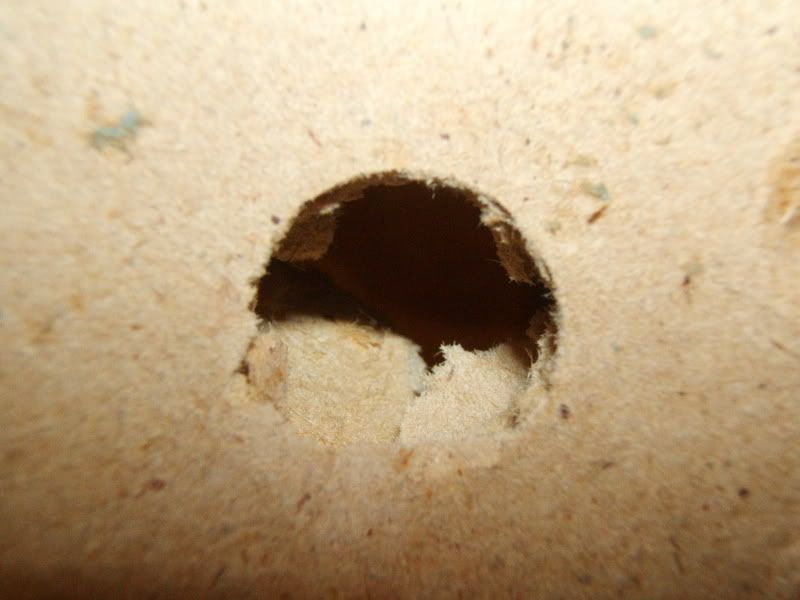
For the first time I used some new muzzle loader sabots and a 50 cal. lead round ball. AAAnndd for the first time i pushed it up to 350PSI. I thought my pump was maxing at 302PSI or so, but as it turns out the gauge was just sticking a little or something....a few more pumps and up it kept climbing until I voluntarily stopped at 350PSI. Any how I set a piece of 3/4" MDF against a stud in my garage and then a piece of 1/2" OSB in front of that.
Loaded a slightly stretched out 50 Cal. sabot and 50 cal. lead round ball with a piece of light weatherstripping on top to hold in the bullet.
First pic: entry hole in the 1/2" OSB.....
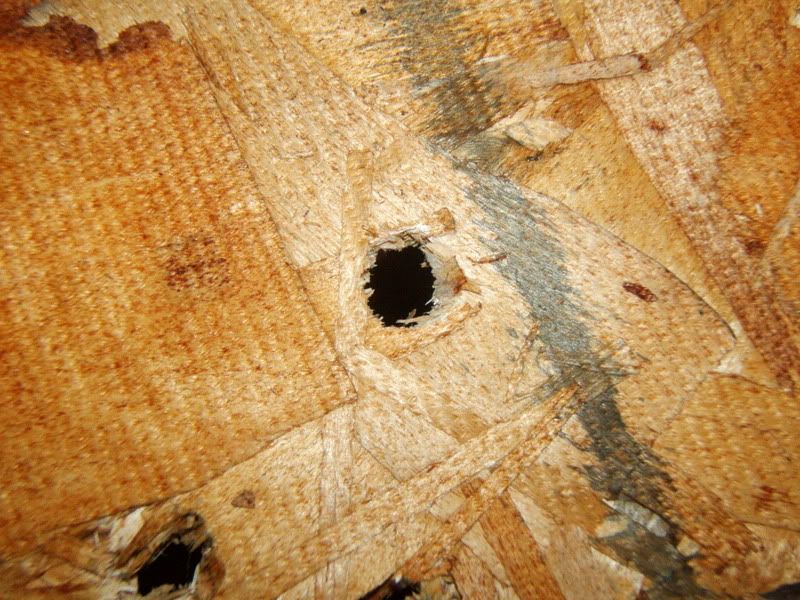
Next pic: exit hole in 1/2" OSB
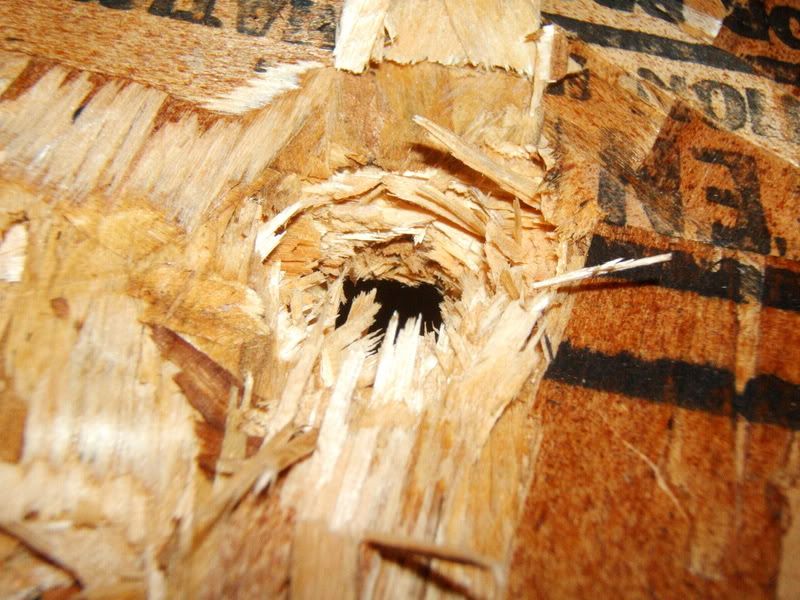
next pic: entrance hole in 3/4" MDF
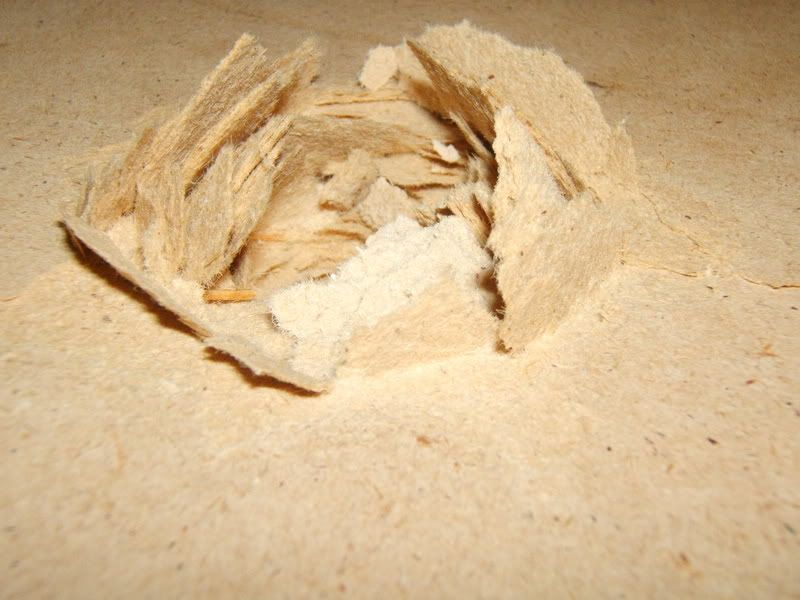
Next two pics: exit hole in 3/4" MDF from two angles, one with the smashed 50 cal. ball for size comparison.
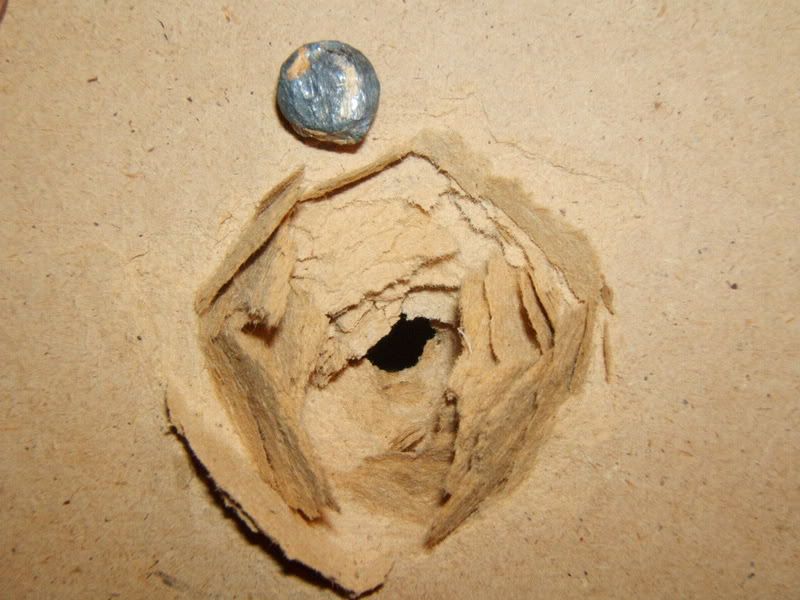
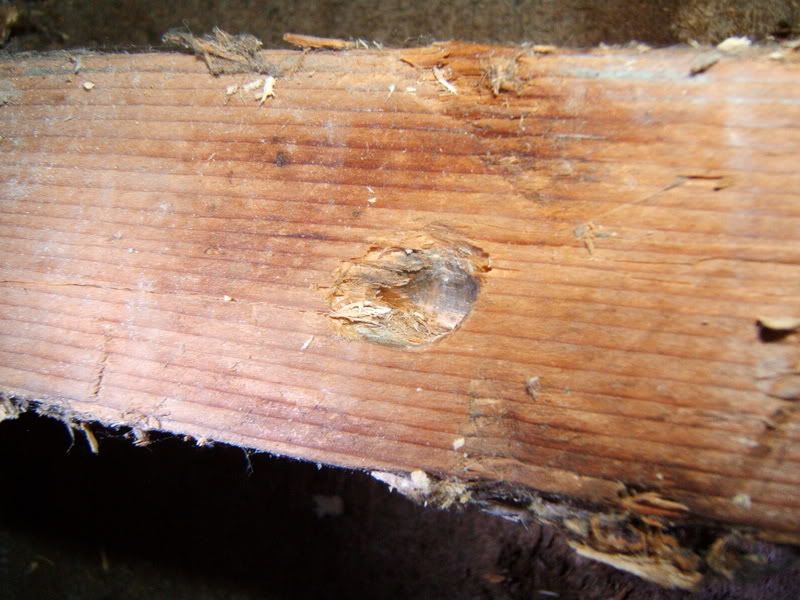
Last pic: The 2X4 stud finally stopped it, but still got about a 1/2" dent in it.
Man, that was the coolest shot yet by far. I am starting to think that I shouldn't shoot it in the garage any more though. Since this time my fiance could here it loud and clear in the living room on the other side of the house while watching TV, and mind you we don't have an attached garage. It would suck to have a cop knocking on my door asking what was going on because one of my neibors thought I was shooting a real gun or something.
Anyhow, I hope to be getting the trigger assembly attached soon so I can update again with actuall cannon construction updates.
as ussual any comments or questions are welcome.
Lock
Loaded a slightly stretched out 50 Cal. sabot and 50 cal. lead round ball with a piece of light weatherstripping on top to hold in the bullet.
First pic: entry hole in the 1/2" OSB.....

Next pic: exit hole in 1/2" OSB

next pic: entrance hole in 3/4" MDF

Next two pics: exit hole in 3/4" MDF from two angles, one with the smashed 50 cal. ball for size comparison.


Last pic: The 2X4 stud finally stopped it, but still got about a 1/2" dent in it.

Man, that was the coolest shot yet by far. I am starting to think that I shouldn't shoot it in the garage any more though. Since this time my fiance could here it loud and clear in the living room on the other side of the house while watching TV, and mind you we don't have an attached garage. It would suck to have a cop knocking on my door asking what was going on because one of my neibors thought I was shooting a real gun or something.
Anyhow, I hope to be getting the trigger assembly attached soon so I can update again with actuall cannon construction updates.
as ussual any comments or questions are welcome.
Lock
Last edited by lockmanslammin on Sun Oct 05, 2014 10:50 am, edited 1 time in total.
-
jackssmirkingrevenge

- Five Star General

- Posts: 26219
- Joined: Thu Mar 15, 2007 11:28 pm
- Has thanked: 582 times
- Been thanked: 348 times
looking good  if you're worried about noise there are plenty of suppressor options you can build to mitigate the muzzle blast, though of course projectile impact will still be just as audible.
hectmarr wrote:You have to make many weapons, because this field is long and short life
-
Gippeto

- First Sergeant 3


- Posts: 2506
- Joined: Sat Jan 19, 2008 10:14 am
- Location: Soon to be socialist shit hole.
- Has thanked: 2 times
- Been thanked: 17 times
Good work! When you get the pressure up, the damage gets really impressive...even a little bit worrisome! 
You have to try steel plate, at 350psi you should be splattering your round ball. I know you will if you get it to 400psi.
You have to try steel plate, at 350psi you should be splattering your round ball. I know you will if you get it to 400psi.
"It could be that the purpose of your life is to serve as a warning to others" – unknown
Liberalism is a mental disorder, reality is it's cure.
Liberalism is a mental disorder, reality is it's cure.
-
lockmanslammin
- Specialist
- Posts: 152
- Joined: Sun Feb 10, 2008 3:22 pm
- Location: Sioux Falls, South Dakota
I think if I shot at a steel plate the round ball would be in little bits all over the garage, (like the wood is currently..hehehe). I think the wood acts as a cushion to the lead slowing it down slowly enough that it remains in one piece. But this is the only shot like this I have taken yet. The last was a 54 cal lead ball at a piddly 120PSI. Now that I know the pump isn't maxing out I will try my previous plan to pump it too 500 psi a few times, and actuating the trigger with a broom from around the corner or something for safety testing, and then sticking to 400PSI for my shots.
I wonder what would happen to it if I had a failure at 4 or 500PSI. After seeing what the bullet does and what it sounds like when it fires it kinda freaks me out a bit actually. I tried to build it as solid as possible. I did a couple xtra things, such as not grinding the pipe stops out of the tee for the piston valve. That always sounded strange to me, like you would be destroying the integrity of the fitting.
I can't wait to see some damage from that insane beast you are building Gippeto. 3,000PSI! WOOOHOOO
thanx for the replies guys.
Lock
-
lockmanslammin
- Specialist
- Posts: 152
- Joined: Sun Feb 10, 2008 3:22 pm
- Location: Sioux Falls, South Dakota
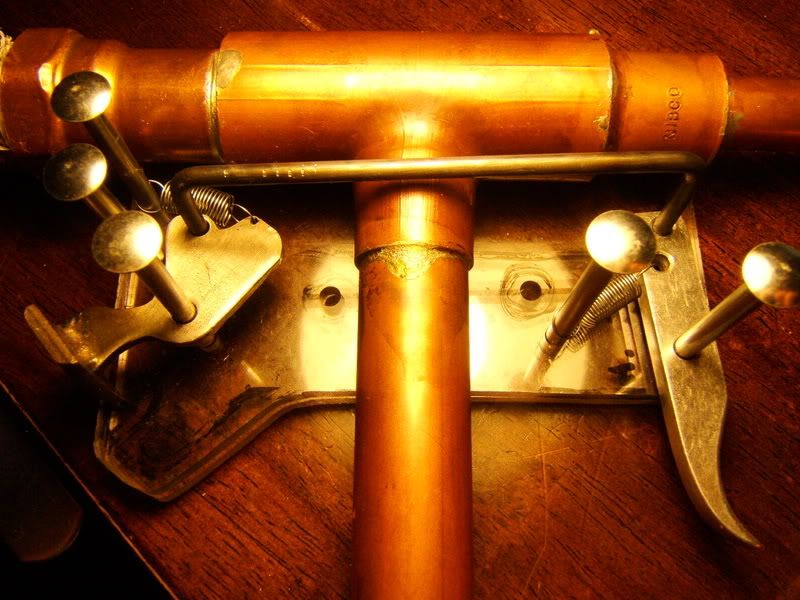
A few pics of the trigger and sear assembly for my spring actuated ball valve pilot.
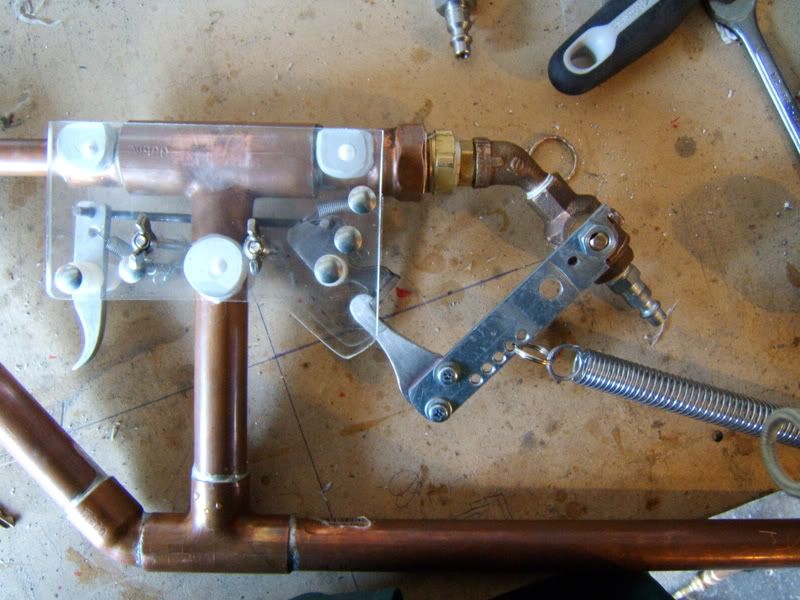
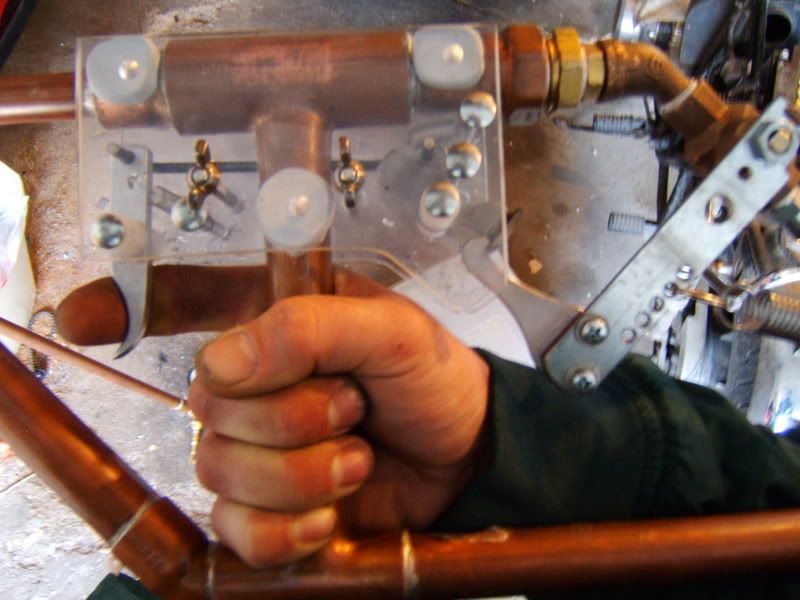
This assembly is totally servicable, although I hope it never needs it. I had to build jigs and spacers and all sorts of crap to get it in place accurately. you can see the 3 epoxy attachment points. The epoxy is stuck to the copper pipe, but not to the plexy trigger body. I used a counter sink to make key holes in the inside of the plexy and the puddy epoxy forms the male part of the key. The two screws/ wing nuts hold the whole thing together. It has about a 3 pound trigger pull I'm guessing. The ball valve opens pretty quick, but not too fast to break itself. It is now much easier to aim and hold steady while shooting all I need to add are sights. And then a quick clean up of the solder joints and I believe it is done.
Here are some more pics showing different aspects of the design.
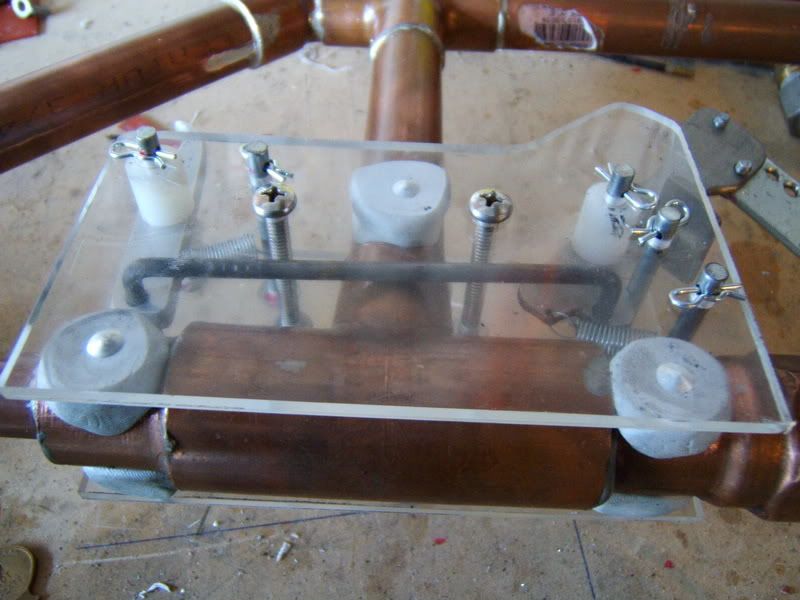
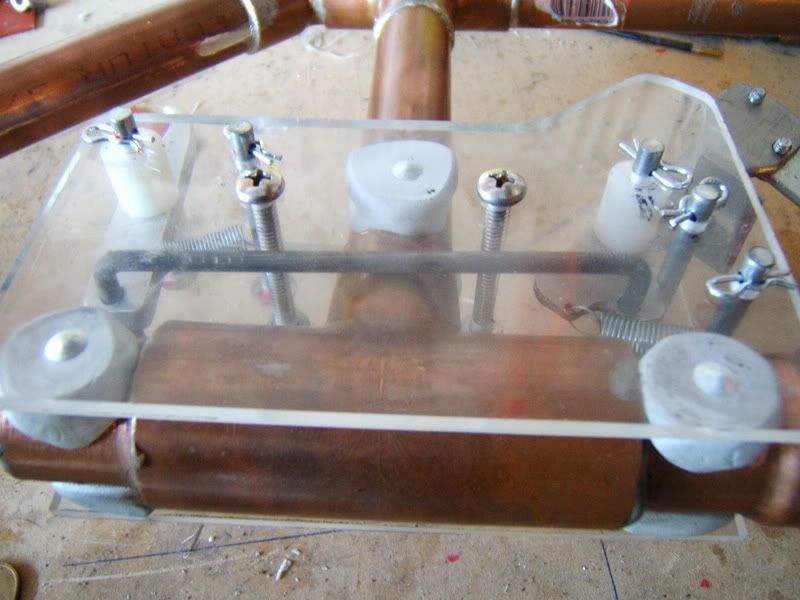
If any body has any comments of questions, I would be happy to answer them.
Lock
Last edited by lockmanslammin on Sun Oct 05, 2014 11:13 am, edited 1 time in total.
-
THUNDERLORD
- Sergeant 3

- Posts: 1264
- Joined: Fri Mar 28, 2008 1:42 pm
Great stuff!!! I was looking at your photos of build/ sear especially and thinking that your username should be kalishnikov or something. Thanks 8)
-
jackssmirkingrevenge
- Five Star General
- Posts: 26219
- Joined: Thu Mar 15, 2007 11:28 pm
- Has thanked: 582 times
- Been thanked: 348 times
slick, would be great to see a video of it in action
hectmarr wrote:You have to make many weapons, because this field is long and short life
-
Gippeto
- First Sergeant 3
- Posts: 2506
- Joined: Sat Jan 19, 2008 10:14 am
- Location: Soon to be socialist shit hole.
- Has thanked: 2 times
- Been thanked: 17 times
That's some nice work Lock.
Two thumbs up!
Two thumbs up!
"It could be that the purpose of your life is to serve as a warning to others" – unknown
Liberalism is a mental disorder, reality is it's cure.
Liberalism is a mental disorder, reality is it's cure.
-
bigbob12345

- Staff Sergeant

- Posts: 1516
- Joined: Sat Dec 01, 2007 9:13 am
- Location: Mercer Island,Washington
Wow very impressive work
seems to have good power too it
seems to have good power too it
-
lockmanslammin
- Specialist
- Posts: 152
- Joined: Sun Feb 10, 2008 3:22 pm
- Location: Sioux Falls, South Dakota
Thanx for all the nice comments fellas. Getting that assembly on the cannon, squarely, was the hardest part of this build.
JSR: I was thinking of trying a video. I have never posted a video online, and I don't have a digital video camera other than the video clip function on my fuji digital camera, and my web cam. Still I may try to post one.
It works real slick. My only concern is that I never added a bumper of any sorts, because frankly I just wasn't thinking about it, but I sure could make it open faster if I had one. Although it does open faster than by hand, so it is still an upgrade. Plus its not like the ball valve is my primary valve anyhow.
Lock
-
jackssmirkingrevenge
- Five Star General
- Posts: 26219
- Joined: Thu Mar 15, 2007 11:28 pm
- Has thanked: 582 times
- Been thanked: 348 times
That's exactly how I make my videoslockmanslammin wrote:JSR: I was thinking of trying a video. I have never posted a video online, and I don't have a digital video camera other than the video clip function on my fuji digital camera, and my web cam. Still I may try to post one.
hectmarr wrote:You have to make many weapons, because this field is long and short life
-
lockmanslammin
- Specialist
- Posts: 152
- Joined: Sun Feb 10, 2008 3:22 pm
- Location: Sioux Falls, South Dakota
I realise this is a crappy video, but here you go.
For some reason the camera's mic didn't pic up the loud bang this thing puts out at 350 psi. That shot went through like 4 layers of 1/4" OSB (oriented strand board). The projectile was a glass .5" marble in a greased t-shirt patch, sold as a slingshot ammo. The cannon actually has a little kick even with that light of an ammo.
This is the first time I have ever tried posting a video, so I hope it works.
Lock

VIDEO LINK^^^^ VIDEO LINK^^^^ VIDEO LINK^^^^
For some reason the camera's mic didn't pic up the loud bang this thing puts out at 350 psi. That shot went through like 4 layers of 1/4" OSB (oriented strand board). The projectile was a glass .5" marble in a greased t-shirt patch, sold as a slingshot ammo. The cannon actually has a little kick even with that light of an ammo.
This is the first time I have ever tried posting a video, so I hope it works.
Lock
VIDEO LINK^^^^ VIDEO LINK^^^^ VIDEO LINK^^^^
Last edited by lockmanslammin on Sun Oct 05, 2014 1:47 pm, edited 2 times in total.
-
SpudFarm
- First Sergeant 3
- Posts: 2571
- Joined: Sat Nov 04, 2006 9:39 am
- Location: Norway Trondheim area
NICE i love it!
that is some extreme damage with a marble on that two by four! i cant do that with my pneumatic.. my hybrid had trouble with that at 4x..
once more NICE a$$ gun!
that is some extreme damage with a marble on that two by four! i cant do that with my pneumatic.. my hybrid had trouble with that at 4x..
once more NICE a$$ gun!
"Made in France"
- A spud gun insurance.
- A spud gun insurance.
Create an account or sign in to join the discussion
You need to be a member in order to post a reply
Create an account
Not a member? register to join our community
Members can start their own topics & subscribe to topics
It’s free and only takes a minute
Sign in
-
- Similar Topics
- Replies
- Views
- Last post
-
- 16 Replies
- 15739 Views
-
Last post by Brian the brain
-
- 15 Replies
- 9246 Views
-
Last post by SpudFarm
-
- 5 Replies
- 3352 Views
-
Last post by SEAKING9006
-
- 12 Replies
- 4585 Views
-
Last post by MrCrowley
-
- 34 Replies
- 27885 Views
-
Last post by jackssmirkingrevenge