Pneumatic Golf Ball Launcher - Piston Problems


That is possible, but only with a good pilot valve and a very tight piston. Use o-rings if you can.
-
rikukiakuchiki777

- Specialist

- Posts: 110
- Joined: Wed Feb 11, 2009 1:00 am
- Location: Australia
Ah the joys of knowing this one will be serviceable! I've got a 1" sprinkler valve as a pilot, and there is next to no gap between the piston and piston housing. I'll give that a go, see what happens and post an update. I might not get around to completing this for maybe a week or so though but thanks a million for everyones help. Oh the piston is extremely light, if that will make any differencepsycix wrote:That is possible, but only with a good pilot valve and a very tight piston. Use o-rings if you can.
BLASPHEMY!!sl33k wrote:also what is JSR? it is probably obvious but I'm new
-
rikukiakuchiki777
- Specialist
- Posts: 110
- Joined: Wed Feb 11, 2009 1:00 am
- Location: Australia
Well I'm making slow progress, but it's coming together. This is the piston so far:
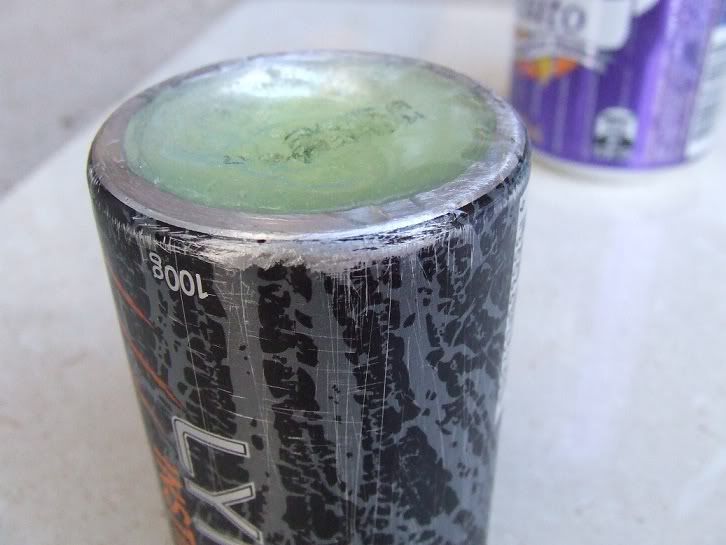
This is the indent in the end of a deodorant can filled with epoxy. This is the rear of the piston, so the purpose behind the epoxy was more surface area contacting the bumper and thus the force is distributed.
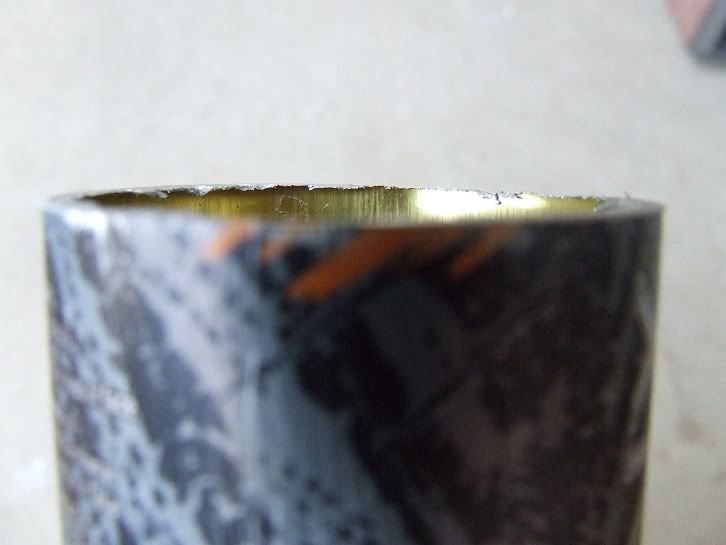
This is the sealing face end (unfinished; there is no actual 'face' to it yet), sanded flat with an angle grinder.
I plan to make the piston as light as possible, and so far I can slide the piston back and forth inside the tee just by exhaling and inhaling. This brings me to my concern - I don't want to bolt the rubber disc down like my previous launchers piston as the bolt will add substantial weight to the piston. What I was thinking was, using JSR's tutorial, fill the end with approximately 1/2cm of epoxy and then place the rubber on top and let the epoxy set. Basically - epoxy the rubber disc on. Would ~100 psi be too much pressure and rip the rubber off?
Oh and another thing, the rubber disc I have is a bit large and I need to cut it down. Without a hole saw is there a way to do this whilst still keeping the outside edges flush/smooth/whatever?
edit: sorry for the previously posted pictures (hah! alliteration makes me laugh ) that are quite large - I'm a complete forum newb and it never even occurred to me to resize them.
This is the indent in the end of a deodorant can filled with epoxy. This is the rear of the piston, so the purpose behind the epoxy was more surface area contacting the bumper and thus the force is distributed.
This is the sealing face end (unfinished; there is no actual 'face' to it yet), sanded flat with an angle grinder.
I plan to make the piston as light as possible, and so far I can slide the piston back and forth inside the tee just by exhaling and inhaling. This brings me to my concern - I don't want to bolt the rubber disc down like my previous launchers piston as the bolt will add substantial weight to the piston. What I was thinking was, using JSR's tutorial, fill the end with approximately 1/2cm of epoxy and then place the rubber on top and let the epoxy set. Basically - epoxy the rubber disc on. Would ~100 psi be too much pressure and rip the rubber off?
Oh and another thing, the rubber disc I have is a bit large and I need to cut it down. Without a hole saw is there a way to do this whilst still keeping the outside edges flush/smooth/whatever?
edit: sorry for the previously posted pictures (hah! alliteration makes me laugh
-
jackssmirkingrevenge

- Five Star General

- Posts: 26219
- Joined: Thu Mar 15, 2007 11:28 pm
- Has thanked: 582 times
- Been thanked: 348 times
Find a lighter bolt, but do put one. Even if you roughen up rubber correctly epoxy usually has a hard time holding on to it under tension, personally I wouldn't risk it.rikukiakuchiki777 wrote:I don't want to bolt the rubber disc down like my previous launchers piston as the bolt will add substantial weight to the piston.
It doesn't have to be perfectly smooth or round, just not touching the sides of the chamber, you can cut it with a craft knife.Oh and another thing, the rubber disc I have is a bit large and I need to cut it down. Without a hole saw is there a way to do this whilst still keeping the outside edges flush/smooth/whatever?
*sigh* hehehehe(hah! alliteration makes me laugh
hectmarr wrote:You have to make many weapons, because this field is long and short life
-
rikukiakuchiki777
- Specialist
- Posts: 110
- Joined: Wed Feb 11, 2009 1:00 am
- Location: Australia
Well I haven't posted in a while (not that anyone is eagerly awaiting the completion of another clichéd barrel sealer), but I have in fact finished, in terms of construction, the new launcher. I made a quick video of some test shots at 2 sheets of plywood, both 1/4".
[youtube][/youtube]
Ignore the laughter, it was a friend who wanted to witness the test shots and had never really seen anything like this. Oh and I increased the pressure in 10psi increments, I just didn't film it all - In case your wondering why I stepped it up from 40 to 70 psi.
A few shots later, the piston went from this:
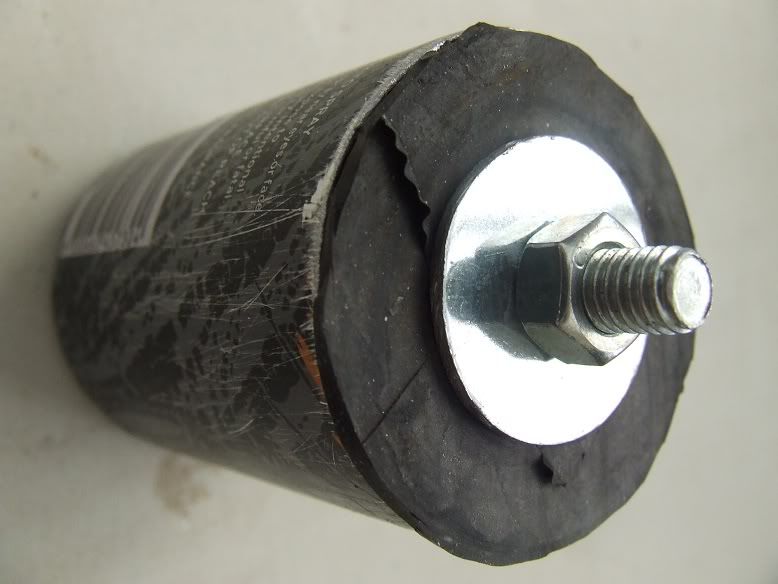
To this:

I should have realised that would happen with the thin aluminium walls, but I'm rebuilding a reinforced one.
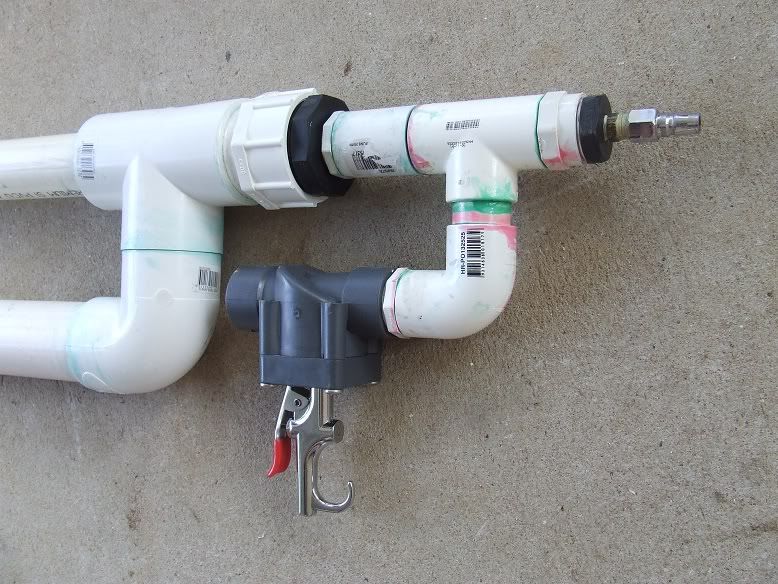
Anyway, this is the pilot area now:
And the whole thing:
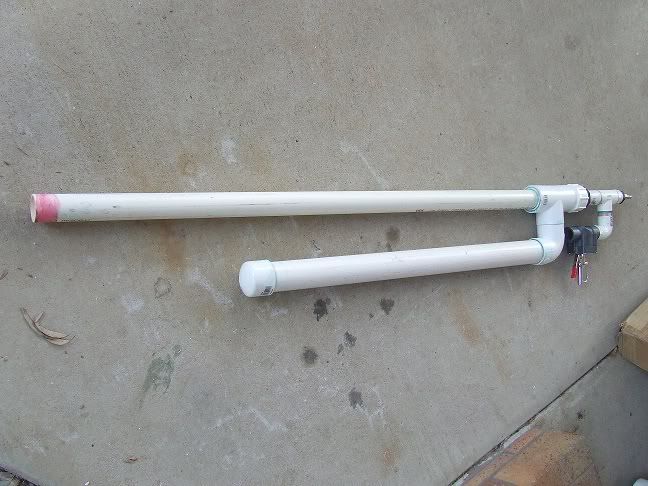
Ignore the crappy priming and paint stains, I'm really careless with that stuff
I hope you all like the new gun. Once it works consistently I will paint it and re-post in the showcase. Any ideas for a paint job (other than the flat black I'm planning to do) would be appreciated.
[youtube][/youtube]
Ignore the laughter, it was a friend who wanted to witness the test shots and had never really seen anything like this. Oh and I increased the pressure in 10psi increments, I just didn't film it all - In case your wondering why I stepped it up from 40 to 70 psi.
A few shots later, the piston went from this:
To this:
I should have realised that would happen with the thin aluminium walls, but I'm rebuilding a reinforced one.
Anyway, this is the pilot area now:
And the whole thing:
Ignore the crappy priming and paint stains, I'm really careless with that stuff
I hope you all like the new gun. Once it works consistently I will paint it and re-post in the showcase. Any ideas for a paint job (other than the flat black I'm planning to do) would be appreciated
-
MrCrowley

- Moderator

- Posts: 10078
- Joined: Fri Jun 23, 2006 10:42 pm
- Location: Auckland, New Zealand
- Been thanked: 3 times
Haha shame about the piston. If you look at the piston I built out of a deodorant can in my first tutorial, the whole inside of the can is filled with glue, sounds heavy but it's not very long and weight isn't the worst problem that can effect performance anyway.
-
rikukiakuchiki777
- Specialist
- Posts: 110
- Joined: Wed Feb 11, 2009 1:00 am
- Location: Australia
Yeah it is a shame, I was a little disappointed because I was having so much fun! It had been ages since I'd fired a spud gun hehe, and this was my first *working* pneumatic so it was even better.
My new piston is the same thing however I've got a piece of PVC inside the deodorant can thats nearly the same OD as the cans ID, but I will fill the gap with epoxy. Its still extremely light, and should be capable of withstanding a lot more. Oh and I think my bumper was inadequate. I just chucked a fairly thick piece of rubber in to handle the 40psi shots, then forgot all about it and kept upping the pressure.
My new piston is the same thing however I've got a piece of PVC inside the deodorant can thats nearly the same OD as the cans ID, but I will fill the gap with epoxy. Its still extremely light, and should be capable of withstanding a lot more. Oh and I think my bumper was inadequate. I just chucked a fairly thick piece of rubber in to handle the 40psi shots, then forgot all about it and kept upping the pressure
Create an account or sign in to join the discussion
You need to be a member in order to post a reply
Create an account
Not a member? register to join our community
Members can start their own topics & subscribe to topics
It’s free and only takes a minute
Sign in
-
- Similar Topics
- Replies
- Views
- Last post
-
- 4 Replies
- 3290 Views
-
Last post by CS
-
- 13 Replies
- 13985 Views
-
Last post by wdr0
-
- 16 Replies
- 6870 Views
-
Last post by mysticjbyrd
-
- 3 Replies
- 1342 Views
-
Last post by jeepkahn
-
- 13 Replies
- 6278 Views
-
Last post by Collo