First piston gun -- 1.25" PVC Coax

Show us your pneumatic spud gun! Discuss pneumatic (compressed gas) powered potato guns and related accessories. Valve types, actuation, pipe, materials, fittings, compressors, safety, gas choices, and more.
plinkin
Private 2
Private 2
Posts: 24
Joined: Sun Jun 12, 2011 5:17 pm

Wed Jul 11, 2012 6:59 pm

Hello spudfiles! :) First, some background: Someone turned on the spudding switch on me lately... and so I was itching to get back in the groove. The last piston cannon I built (3 years ago, freshman year) failed because of flow issues... It was a 2 inch tee barrel sealing cannon. I'll work on that when I have the time. I've also built a pen gun (which, of late, got something jammed down the barrel... oops. I'll fix that too) But in the meanwhile, I built a whole new cannon with all the experience gained from browsing the forums in the past years (and a new drill press and scroll saw, too).
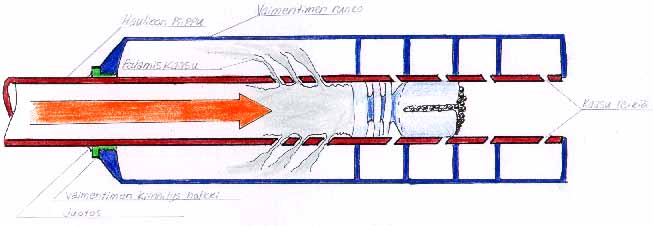
It's pretty simple...
Image
Image
Image

Here's the suppressor:
Image
Image
Image
I found a 1/2" "cut-off rise" consisting of many threaded segments together... With a mallet it was a perfect fit inside of 3/4" PVC. 1/4" holes are drilled in a spiral all around the inner. The bushings to bring it up to the 1.5" PVC sheath are cut out of plywood on my scroll saw, and there's a screw countersunk into the sheath to hold things together. And there's a 1/2" female coupler on the front of the barrel on the cannon.

And this:
Image
is how I kept a blowgun pilot assembly to around $5. (without the blowgun I already had). The schrader valve is off a bike inner tube, cut to fit a 1/2" end cap perfectly, and JB welded into the cap. Why make the whole thing brass if you don't have to? haha. The tee is threaded on the bottom leg, where a 1/2" to 1/4" threaded adapter connects to a 1/4" galvanized closed nipple and then to the blowgun.
It doesn't work yet. lol. Can't wait to replace the seals :lol:

Specs:

cost about $20 USD (haha, no brass!!!)
Chamber: 1.25" sch 40 PVC, ~35" long
Barrel: 1/2" sch 40 PVC, ~37" long
Piston: 3/4" PVC end cap with rubber washer bolted to the front
Pilot: will be a blowgun once I replace the seals on it (modded it already... can someone tell me if this is enough, though?). For now I'm using a 1/2" PVC ball valve.

I've only been able to test it up to 80 PSI or so, because I don't know how to increase the limit on my puny 2 gal compressor's auto shut-off.

Here are some "proof of function" (don't deserve to be called test shots) at 60 PSI, AA battery as ammo. The sound on video is so wimpy, ugh.

Image
Image
Image

Here's the suppressor:
Image
Image
Image
I found a 1/2" "cut-off rise" consisting of many threaded segments together... With a mallet it was a perfect fit inside of 3/4" PVC. 1/4" holes are drilled in a spiral all around the inner. The bushings to bring it up to the 1.5" PVC sheath are cut out of plywood on my scroll saw, and there's a screw countersunk into the sheath to hold things together. And there's a 1/2" female coupler on the front of the barrel on the cannon. I feel like a hit man screwing it on, hahaha.

And this:
Image
is how I kept a blowgun pilot assembly to around $5. (without the blowgun I already had). The schrader valve is off a bike inner tube, cut to fit a 1/2" end cap perfectly, and JB welded into the cap. Why make the whole thing brass if you don't have to? haha. The tee is threaded on the bottom leg, where a 1/2" to 1/4" threaded adapter connects to a 1/4" galvanized closed nipple and then to the blowgun.
It doesn't work yet. lol. Can't wait to replace the seals :lol:

Specs:

cost about $20 USD (haha, no brass!!!)
Chamber: 1.25" sch 40 PVC, ~35" long
Barrel: 1/2" sch 40 PVC, ~37" long
Piston: 3/4" PVC end cap with rubber washer bolted to the front
Pilot: will be a blowgun once I replace the seals on it (modded it already... can someone tell me if this is enough, though?). For now I'm using a 1/2" PVC ball valve.

I've only been able to test it up to 80 PSI or so, because I don't know how to increase the limit on my puny 2 gal compressor's auto shut-off.

Here are some "proof of function" (don't deserve to be called test shots) at 60 PSI, AA battery as ammo. The sound on video is so wimpy, ugh.

[youtube][/youtube]

It is waiting for a paint job... I was thinking black with yellow stripes, maybe even faux carbon fiber with yellow stripes.
Last edited by jrrdw on Sun Nov 17, 2013 9:48 am, edited 4 times in total.
Reason: Fixed video.
evanmcorleytv
Specialist 3
Specialist 3
Posts: 350
Joined: Sat Jun 19, 2010 3:44 pm
Location: Tuscaloosa, AL

Wed Jul 11, 2012 7:09 pm

Looks good, the 2 inch piston cannon sounds good too.
User avatar
cowscankill
Private 4
Private 4
United States of America
Posts: 73
Joined: Sun Apr 10, 2011 8:09 am

Sun Nov 11, 2012 3:15 pm

I like the simplicity of the design and the cheap cost too. I can't quite tell how your piston is made; is it a flat end cap with tape on it? The only 3/4" end caps I can find are the round type.
plinkin
Private 2
Private 2
Posts: 24
Joined: Sun Jun 12, 2011 5:17 pm

Sun Nov 11, 2012 3:25 pm

Yep! It's a flat 3/4" endcap bound with electrical tape in order to close up the gap (because the endcap's side surface is tapered, this increases the diameter of the narrower end). There is a rubber washer bolted on the front (bolt head on the inside) with a small washer between the nut and the rubber's face.

If you can't find a flat end cap, you could improvise. Glue some flat face (maybe a polycarb disk) on the open end of the end cap, and the rubber washer will be attached to this face. Then, drill a hole in the closed, round end, and the bolt will be secured through this hole and a hole in the polycarb/rubber washer sealing face on the other end. That way you can take advantage of the close fit between 1.25" PVC and the endcap.
User avatar
cowscankill
Private 4
Private 4
United States of America
Posts: 73
Joined: Sun Apr 10, 2011 8:09 am

Sun Nov 11, 2012 6:38 pm

I could only find rubber washers 1.5" in diameter. Can I use this or should I look for a new washer?
plinkin
Private 2
Private 2
Posts: 24
Joined: Sun Jun 12, 2011 5:17 pm

Sun Nov 11, 2012 6:50 pm

You could trim that down, making sure to keep the edge even, but it's up to you. I used a 1.25" rubber washer.
User avatar
cowscankill
Private 4
Private 4
United States of America
Posts: 73
Joined: Sun Apr 10, 2011 8:09 am

Sun Nov 11, 2012 7:18 pm

I think the thing I am most confused about is does the side of the 3/4" plug need to be sealed well with the inside of the chamber? The washer isn't supposed to rub along the sides of the chamber, is it? I'm trying to figure out/decide which part if any of the piston needs to be air tight.

EDIT: Maybe I just need a picture of your piston lol.
Resin pistons are almost airtight all the way around and the sealing face just needs to be placed on the barrel. Is this same concept being applied to the 3/4" endcap?
plinkin
Private 2
Private 2
Posts: 24
Joined: Sun Jun 12, 2011 5:17 pm

Sun Nov 11, 2012 7:39 pm

the side surfaces of the 3/4" endcap needs to be a sliding fit inside the chamber.
The washer doesn't rub the sides of the chamber, so the evenness isn't critical, but make sure the washer can seal the barrel in all circumstances. The bolt joint with the washer and endcap should be airtight so air doesn't leak through the gaps in bolt hole.
User avatar
jackssmirkingrevenge
Five Star General
Five Star General
Posts: 26179
Joined: Thu Mar 15, 2007 11:28 pm
Has thanked: 543 times
Been thanked: 321 times

Donating Members

Tue Nov 13, 2012 12:00 am

Hadn't seen this, looks good!

Have you put any baffles in the suppressor or is it just a single expansion chamber?
hectmarr wrote:You have to make many weapons, because this field is long and short life
plinkin
Private 2
Private 2
Posts: 24
Joined: Sun Jun 12, 2011 5:17 pm

Tue Nov 13, 2012 12:06 am

Thanks JSR! :wink:
There aren't any baffles in the suppressor... How much would they help? Would they just be, say, wood or plexiglass disks spaced apart?
User avatar
jackssmirkingrevenge
Five Star General
Five Star General
Posts: 26179
Joined: Thu Mar 15, 2007 11:28 pm
Has thanked: 543 times
Been thanked: 321 times

Donating Members

Tue Nov 13, 2012 1:30 am

plinkin wrote:There aren't any baffles in the suppressor... How much would they help?
Have a look at this diagram:

Image

Without baffles, as soon as air begins to enter the first exposed ports, it is free to rush past the projectile position in the inner barrel and exit the muzzle via the forward ports. Having baffles as in the diagram effectively "locks in" this air into separate chambers, allowing it more time to expand and not overtake the projectile.
Would they just be, say, wood or plexiglass disks spaced apart?
For a relatively low pressure pneumatic that would be more than enough.
hectmarr wrote:You have to make many weapons, because this field is long and short life
plinkin
Private 2
Private 2
Posts: 24
Joined: Sun Jun 12, 2011 5:17 pm

Tue Nov 13, 2012 1:35 am

Sounds like a good improvement. I'll take care of that once time allows. Currently, college apps are overwhelming.
User avatar
cowscankill
Private 4
Private 4
United States of America
Posts: 73
Joined: Sun Apr 10, 2011 8:09 am

Tue Nov 13, 2012 7:18 pm

I've gotten mine to work very well now, thanks for the help! I'll post pictures in a day or two after it's mounted in the stock completely (one more bolt to fit in somehow) After that, it's testing and painting time.
I was wondering, does your T intersection pilot set up work well? The design I went with didn't work at all until I filled almost all of the dead space in the pilot.
I plan on making another, maybe multiple, copies of this gun for friends and such, but I want an easy to replicate pilot with manufactured parts rather than custom making it like I did.
plinkin
Private 2
Private 2
Posts: 24
Joined: Sun Jun 12, 2011 5:17 pm

Tue Nov 13, 2012 7:30 pm

Wow, that's awesome! I'm really glad to return the help in the spudding community after all I've learned. hahaha :P Looking forward to the finished product!

On the blowgun pilot valve, yes... your suspicions are true. I actually never got the blowgun setup to work reliably because of all the dead space, but that's because I haven't yet modified the blowgun by opening up the porthole a bit.
Result - wasted air out the rear end by using a 1/2" ball valve trigger... but at least it works.

If you modify your blowgun and get it to work, please let me know! Keeping my fingers crossed that the dead space isn't a big issue.
User avatar
cowscankill
Private 4
Private 4
United States of America
Posts: 73
Joined: Sun Apr 10, 2011 8:09 am

Tue Nov 13, 2012 9:24 pm

Well I didn't actually modify my trigger itself, because I didn't know you could do that haha. Also machining metal is a little harder than modifying the housing. I'll have to take a picture of one of my coaxial end caps to show you how I fixed it...
If the T intersection didn't work, I think I might try a smaller variation using maybe just a plug and a coupler rather than a cap and T. Shrader goes into the plug, blowgun goes into the side of the couple/plug assembly. Or just using a brass fitting, which would seem to be the smallest, but more expensive.
Post Reply