Page 2 of 4
Posted: Sun Jul 31, 2011 4:33 pm
by Gun Freak
You don't really need a tutorial, it is rather simple.

Posted: Sun Jul 31, 2011 4:34 pm
by DerpWithAGun
Wow! That looks so simple I'm so trying that right now! Thanks Gun Freak!
EDIT: There is two there which one is better? Or are they both the same thing just at different stages?
Posted: Sun Jul 31, 2011 4:35 pm
by Gun Freak
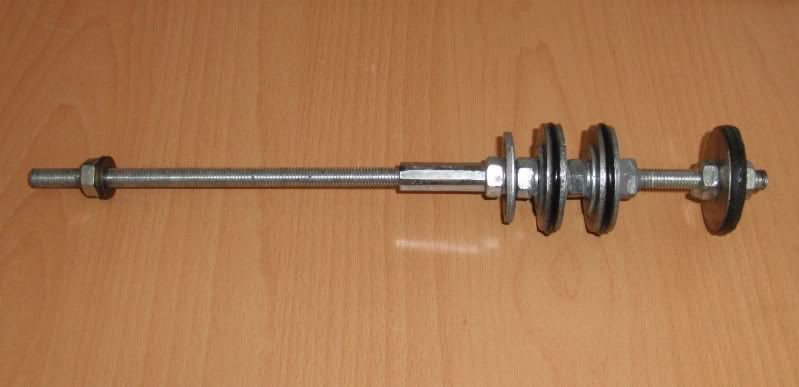
No problem, but in that picture it doesn't have notches cut on the washers in front of each o-ring that makes the floating o-rings act as a check valve. I can explain further if you don't get it.
Posted: Sun Jul 31, 2011 4:41 pm
by DerpWithAGun
lol, I don't get it. Are you saying i have to cut notches or I don't because of the rubber o-rings?
Posted: Sun Jul 31, 2011 4:59 pm
by Gun Freak
You cut the notches, like in the attached picture.
The o-ring cannot seal while the cannon is being filled, because the floating o-rings are not sealing against a round surface (because of the notches). When the pilot volume is exhausted, the chamber pressure shifts the o-rings to the rear position, sealing them against the washers behind each o-ring (the ones without notches), making a perfect seal and no chamber pressure is wasted out the pilot (theoretically). This is known as a piston with a built in check valve, because air can pass it while filling, but can't go back. How effective this really is compared to a piston without a check valve, I don't know. But, it is definitely worth making. Also, since the o-rings are floating, the piston has barely any friction and slides freely. So, with the added benifits of the check valve and low friction, this piston performs very well. Over time, the washers in the back will warp due to repeated abuse, but its a 50 cent fix to buy a few new ones. The whole piston only costs like 5 bucks so give it a whirl! This was built for a 2" piston valve, so all you need to do is scale it down for your needs, and it will be cheaper. O-rings can be expensive at big sizes. Hope this helps!
Posted: Sun Jul 31, 2011 5:27 pm
by SpudBlaster15
Lorem ipsum dolor sit amet, consectetur adipiscing elit. Cras nec placerat erat. Vivamus dapibus egestas nunc, at eleifend neque. Suspendisse potenti. Sed dictum lacus eu nisl pretium vehicula. Ut faucibus hendrerit nisi. Integer ultricies orci eu ultrices malesuada. Fusce id mauris risus. Suspendisse finibus ligula et nisl rutrum efficitur. Vestibulum posuere erat pellentesque ornare venenatis. Integer commodo fermentum tortor in pharetra. Proin scelerisque consectetur posuere. Vestibulum molestie augue ac nibh feugiat scelerisque. Sed aliquet a nunc in mattis.
Posted: Sun Jul 31, 2011 6:44 pm
by MrCrowley
Not shown (or not clearly obvious) in Gun Freak's picture is the epoxy used to seal the bolt and washers. If you don't seal them up with epoxy where they thread through the bolt, air can just leak past the o-rings. The valve will still probably work, but you wont get that air tight seal.
Posted: Sun Jul 31, 2011 10:02 pm
by Gun Freak
I just recently jb welded the front before I sold it. Thanks for pointing that out Crowley.
Posted: Sun Jul 31, 2011 11:48 pm
by MrCrowley
You sell them? I find it frustrating enough to make one, let alone two. Epoxying it all together is by far the worst part.
Posted: Mon Aug 01, 2011 1:10 am
by DerpWithAGun
Gun Freak, in the picture you posted, do I have to make that white part? If so what is it made from? I was building my version in the car today on my way to school and i left it in my mum's car and she is working late by half an hour which means when she gets back ill upload a picture of mine and you can help me. Ill also put pictures of my Piston housing and all that stuff. Then you can help me solve problems easier

Thanks for the help.
Posted: Mon Aug 01, 2011 1:33 am
by Crna Legija
I think that white one is his old one and no you don't need it.
Posted: Mon Aug 01, 2011 2:42 am
by DerpWithAGun
-Deleted-
Sorry i had some pictures but they didnt upload correct let me fix hold on
Posted: Mon Aug 01, 2011 2:45 am
by MrCrowley
http://www.spudfiles.com/forums/posting ... 13190.html

I put it into my gun and went to put pressure inside. I head the piston shoot forward and hit the barrel connector. After that air escaped around it and went through the barrel. This happened with my old piston I don't know what to do now. ALL help is appreciated.
Epoxy.
To quote myself earlier:
Not shown (or not clearly obvious) in Gun Freak's picture is the epoxy used to seal the bolt and washers. If you don't seal them up with epoxy where they thread through the bolt, air can just leak past the o-rings. The valve will still probably work, but you wont get that air tight seal.
You will also need to epoxy the sealing face to the front washer, the front washer to the front nut and bolt (and any spring washers), the back supporting washer to the sealing face and any spring washers and nuts holding the supporting washer in place.
Basically, epoxy everything except the area where the sealing face will seal against the seat (barrel).
Edit:
It appears you removed most of your message (please don't do that).
Posted: Mon Aug 01, 2011 2:48 am
by DerpWithAGun
Ok this is my piston

Posted: Mon Aug 01, 2011 2:51 am
by MrCrowley
DerpWithAGun wrote:Argh! Can you please tell my how to put pictures on this from My Documents?
Read the link at the top of my previous post

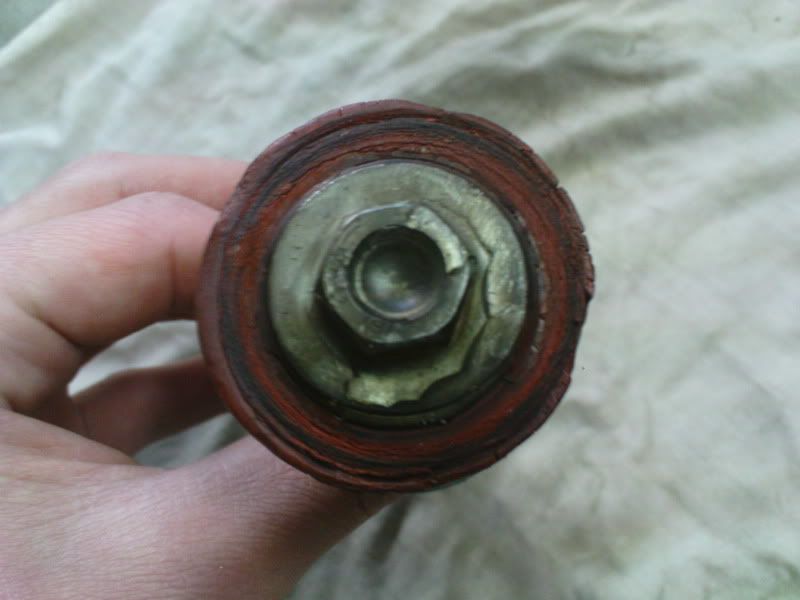
Here are some pictures of my piston showing the epoxy to seal it all together:
You can sort of make out the JB-Weld in this photo
You can see some araldite used to seal the sealing face on this piston here
This photo shows araldite used to seal the sealing face that has become damaged and needed to be replaced
DerpWithAGun wrote:you can tell me where to epoxy
I already have:
MrCrowley wrote:Not shown (or not clearly obvious) in Gun Freak's picture is the epoxy used to seal the bolt and washers. If you don't seal them up with epoxy where they thread through the bolt, air can just leak past the o-rings. The valve will still probably work, but you wont get that air tight seal.
MrCrowley wrote:
You will also need to epoxy the sealing face to the front washer, the front washer to the front nut and bolt (and any spring washers), the back supporting washer to the sealing face and any spring washers and nuts holding the supporting washer in place.
Basically, epoxy everything except the area where the sealing face will seal against the seat (barrel).
