Page 2 of 3
Re: 2018 project
Posted: Sat Dec 16, 2017 5:59 pm
by farcticox1
Got a carry handle attached
Might attach a sight to the top

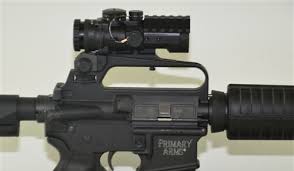
- images.jpg (5.62 KiB) Viewed 6446 times
Slotted the stock rail so it slides in and out quickly
I guess I should slow down a bit, this was my 2018 project

Re: 2018 project
Posted: Sun Dec 17, 2017 11:58 am
by hectmarr
It sounds excellent how it shoots, and everything looks very good. The only thing that left me sad is that you filled that pretty girl with holes.

If you want you can try this :bounce: :bounce:
Re: 2018 project
Posted: Fri Jan 19, 2018 9:16 pm
by farcticox1
Added a laser pointer and an aiming ring so it sort of looks like a red dot sight

A modification to the plunger stop should allow the option of a 2 round burst fire
if it works

the plunger goes 6mm below the opening so 2 BBs should enter the chamber.
Re: 2018 project
Posted: Wed Jan 24, 2018 7:41 am
by jackssmirkingrevenge
Really loving the look, great job as always!
Re: 2018 project
Posted: Sat Aug 04, 2018 5:24 pm
by farcticox1
Pulled it apart and started again, just couldn't get it how I wanted it. Made it pump action

making a QEV
got a nice little normally open 3/2 valve for the trigger. Made a stainless chamber.
Re: 2018 project
Posted: Sat Aug 04, 2018 8:09 pm
by hectmarr
It looks excellent!
Re: 2018 project
Posted: Sun Aug 05, 2018 11:19 am
by farcticox1
QEV worked when tested at 100psi, fixed a leak then turned it up to 140psi and the rubber seal blew out through the exhaust
Need to use a harder rubber
I fixed it with a small screw in the centre thinking it would be more secure and easy to replace.
Re: 2018 project
Posted: Sun Aug 05, 2018 2:05 pm
by hectmarr
A question. Can not suppress QEV and shoot directly from valve 3/2? I have tried and quickly open the air outlet to shoot

I use a 5/2 because I do not have a 3/2, but you can shoot with the escape route, or depressurization. Mine only resists up to about 130 psi.
In the diagram, Blue charging air, and Green, air for shooting.
Re: 2018 project
Posted: Sun Aug 05, 2018 3:12 pm
by farcticox1
Of course, the QEV is a bit more compact and I wanted to make one though.
Re: 2018 project
Posted: Sun Aug 05, 2018 3:27 pm
by hectmarr
farcticox1 wrote:Of course, the QEV is a bit more compact and I wanted to make one though.
you mean you hold more pressure? If you are going to build a QEV, I will be careful because I do not have a QEV and I want to copy how you make it.
Re: 2018 project
Posted: Sun Aug 05, 2018 4:39 pm
by farcticox1
I think it will hold more pressure, the parts I used are each rated at 800psi, the 4mm plug in connector is only 150psi but that is not part of the QEV.
These are the parts I used
https://cdn.automationdirect.com/static ... ttings.pdf
I had to make the threads deeper in the T to get it more compact, and tapped through the 1/2" x 1/4" bush to get the stub threaded from the inside, so also need a 1/4" and 1/2" NPT taps.
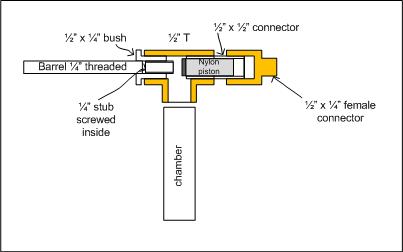
- QEV 02.jpg (12.17 KiB) Viewed 6095 times
The stub I shaped in the drill press
How it sits in the T
Re: 2018 project
Posted: Sun Aug 05, 2018 5:29 pm
by hectmarr
Very clear construction. I will try, in the future, to do something similar. Thanks for the info.
Re: 2018 project
Posted: Mon Aug 06, 2018 7:18 pm
by farcticox1
new harder rubber seal on piston
This is what I used for the piston, block of nylon cut with a hole saw with the centre bit removed
Re: 2018 project
Posted: Tue Aug 07, 2018 8:49 am
by hectmarr
I was watching on YouTube several tutorials on auto construction of a QEV. Actually I think I'm going for a 3/2 high pressure valve. This one that I have in mind, is up to 100 bar about 1400 psi, more than enough.
This is:
http://www.directindustry.es/prod/jaksa ... 39032.html
Re: 2018 project
Posted: Thu Aug 09, 2018 7:25 pm
by farcticox1
Got the new piston seal in and tried it at 150psi, homemade QEV is the way to go, it is really impressive, will have to do a chrono test when I get it completed.