Hybrid ThorJack

Harnessing precision mixtures of pressurized flammable vapor. Not for the beginner.
User avatar
Petitlu
Corporal 4
Corporal 4
Posts: 807
Joined: Fri Jun 03, 2011 4:52 am

For the barrel I put a simple retention of projectile.

I thought black spots had appeared on a shot!

Why you take the cone? seal? you should still put some Loctite ... and with a straight connector, it looks better ...

lol for schemas! great minds think alike!
:D
User avatar
Petitlu
Corporal 4
Corporal 4
Posts: 807
Joined: Fri Jun 03, 2011 4:52 am

Thorjack new configuration:

Quick coupling of paint, removing the flexible and the valve was good for testing but bulky and difficult to put in the Thorjack:
Image

For the barrel, also changes, I removed the quick coupling for connecting to an easier to use when reloading and disc replacement rupture.De more of this system avoids the muzzleloader and prevents the projectile falls with a flat seal, the connection left screwed directly to the barrel.

Image

Image

And finally change the meter at the top the flexible that connects to the quick coupling of the chamber:

Image
User avatar
jackssmirkingrevenge
Five Star General
Five Star General
Posts: 26219
Joined: Thu Mar 15, 2007 11:28 pm
Has thanked: 582 times
Been thanked: 347 times

Ah, it looks much better! No more superglue :D

I'm worried though that the connection is unsafe, particularly the copper (at least it looks like copper) shoulder, I wouldn't be surprised if this sheared off at high mixes. This is under a lot of stress when firing and I don't think this part can take it.
Attachments
dangerouslip.JPG
dangerouslip.JPG (9.78 KiB) Viewed 11044 times
hectmarr wrote:You have to make many weapons, because this field is long and short life
User avatar
Petitlu
Corporal 4
Corporal 4
Posts: 807
Joined: Fri Jun 03, 2011 4:52 am

Only the edges of the shoulder have a maximum of 40 bar and when firing, once the disk broke all the pressure will push the bullet without making significant efforts on the shoulder as the bullet is maintained but not very tight ...
Last, I have a doubt now .... :?

EDIT :I made this shoulder system to reload without removing the barrel.
the barrel linearly advance
User avatar
jackssmirkingrevenge
Five Star General
Five Star General
Posts: 26219
Joined: Thu Mar 15, 2007 11:28 pm
Has thanked: 582 times
Been thanked: 347 times

Petitlu wrote:Only the edges of the shoulder have a maximum of 40 bar and when firing, once the disk broke all the pressure will push the bullet without making significant efforts on the shoulder as the bullet is maintained but not very tight ...
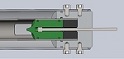
Before the disk breaks, all the pressure will be on this shoulder. Ok, it's for a very short period of time, but that doesn't mean it can't fail.

I haven't sent your package yet, perhaps I can make you a stronger one out of brass?
hectmarr wrote:You have to make many weapons, because this field is long and short life
User avatar
Petitlu
Corporal 4
Corporal 4
Posts: 807
Joined: Fri Jun 03, 2011 4:52 am

it is a weak point is on ...

I thank you but does not manufacture the shoulder.
there are two shoulders, one has the right and one left, and nuts in the middle ...
User avatar
MrCrowley
Moderator
Moderator
Posts: 10078
Joined: Fri Jun 23, 2006 10:42 pm
Location: Auckland, New Zealand
Been thanked: 3 times

Why don't you get rid of the copper piece and just use a brass or galv union?
User avatar
Petitlu
Corporal 4
Corporal 4
Posts: 807
Joined: Fri Jun 03, 2011 4:52 am

I just had an idea, to the shoulder with a brass nozzle ...

EDIT :oh yeah ... but you need a good surface for the seal and disc
User avatar
MrCrowley
Moderator
Moderator
Posts: 10078
Joined: Fri Jun 23, 2006 10:42 pm
Location: Auckland, New Zealand
Been thanked: 3 times

Petitlu wrote:EDIT :oh yeah ... but you need a good surface for the seal and disc
You can always modify the union to get a good surface for the seal. The modified union part below should be attached to the barrel so the disk has a greater surface area to be held against:
Image
Attachments
The red circle indicates the union part that you can modify by removing the taper with an angle grinder
union 2.jpg (30.67 KiB) Viewed 11018 times
User avatar
jackssmirkingrevenge
Five Star General
Five Star General
Posts: 26219
Joined: Thu Mar 15, 2007 11:28 pm
Has thanked: 582 times
Been thanked: 347 times

Petitlu wrote:there are two shoulders, one has the right and one left, and nuts in the middle ...
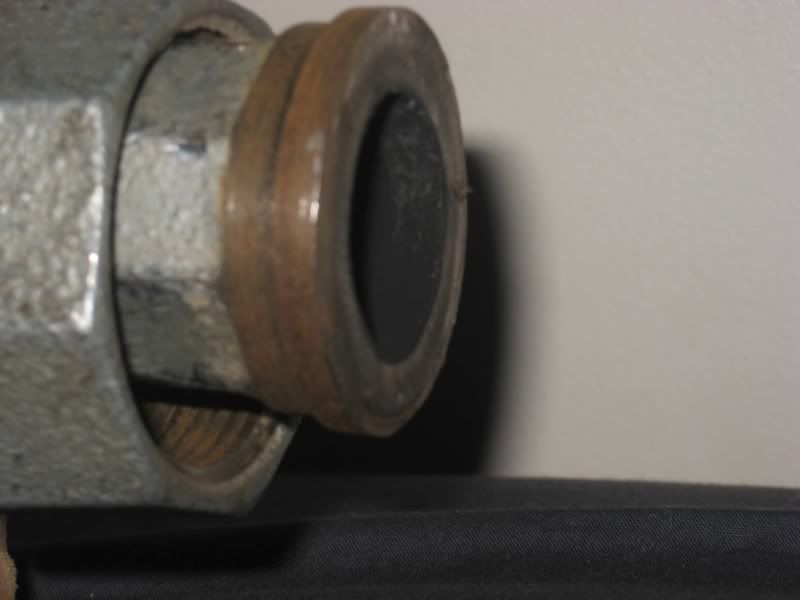
Right, you would need a way to get the nuts on.

For what it's worth, this is the system I'm using at the moment, though I haven't exceeded 20x with this one.

Image

The barrel above was rather stupidly made with a PVC shoulder, which ripped off on firing at 15x. For the 75SD I'm using an acetal/delrin shoulder.
Attachments
barrel fitting.PNG
barrel fitting.PNG (31.55 KiB) Viewed 11015 times
hectmarr wrote:You have to make many weapons, because this field is long and short life
User avatar
Petitlu
Corporal 4
Corporal 4
Posts: 807
Joined: Fri Jun 03, 2011 4:52 am

I just finished the brass nozzle with lime but I am not satisfied ...
Iwill go and see this morning if I find this type of coupling ...
User avatar
CpTn_lAw
Corporal 5
Corporal 5
Posts: 987
Joined: Sun Sep 11, 2005 9:10 am
Location: France

Okay , let me contribute :
I took advice from MrCrowley on the male part (well, i don't have an angle grinder so i hand-sawed the tapered part roughly and then ground it with the dremel.) BUT , I also did another thing.
I took a 16mm copper pipe, slide it through the female part (and greased it with silicon) and then I poured some epoxy until It was level. to get something like this :
Image

I added a fiber joint to the flat male* part to make better contact and resist the repeated heat exposure.


* JSR : This topic doesn't refer to actual flat males. This is strictly "plumbing" parts discussion. :D
"J'mets mes pieds où j'veux, et c'est souvent dans la gueule."
User avatar
jackssmirkingrevenge
Five Star General
Five Star General
Posts: 26219
Joined: Thu Mar 15, 2007 11:28 pm
Has thanked: 582 times
Been thanked: 347 times

CpTn_lAw wrote:and then I poured some epoxy
FTW!

It's how every good story starts hehe

:D
This topic doesn't refer to actual flat males.


Thanks for clarifying, though even this could be horribly misinterpreted by those with sufficiently dirty minds:
This is strictly "plumbing" parts discussion.
:)
hectmarr wrote:You have to make many weapons, because this field is long and short life
User avatar
CpTn_lAw
Corporal 5
Corporal 5
Posts: 987
Joined: Sun Sep 11, 2005 9:10 am
Location: France

I was sure clarifying would do you no good, because your mind is sooooo dirty... it could actually put new metaphores in your mind...
Still, back on topic, this method has never failed on me.
"J'mets mes pieds où j'veux, et c'est souvent dans la gueule."
User avatar
Petitlu
Corporal 4
Corporal 4
Posts: 807
Joined: Fri Jun 03, 2011 4:52 am

Thank you for joining!

I went to the store, I have not found it necessary fittings.
So I took the coupling of PER, reduced PER and I drilled, filed and soldered, and here is the result!

Image

Image

Image
Post Reply

Create an account or sign in to join the discussion

You need to be a member in order to post a reply

Create an account

Not a member? register to join our community
Members can start their own topics & subscribe to topics
It’s free and only takes a minute

Register

Sign in

  • Similar Topics
    Replies
    Views
    Last post