Page 4 of 15
Posted: Fri May 20, 2011 9:41 am
by LeMaudit
I notice you added epoxy around the schrader
I didn't raise the point, out of pure kindness...

Just let it come slowly... every boy start building with adhesive tape, then discover glue, and then, much later.. power tools
 "The Difference Between Men & Boys is the Price of Their Toys"
I like this saying... so true

Posted: Fri May 20, 2011 10:56 am
by jackssmirkingrevenge
Thanks for that, what I was thinking - I like the 2 part plug, I'm already starting to see "shortcuts" and different ways to make the same thing. It's more analogous to epoxy-based construction than you think

velocity3x wrote:I notice you added epoxy around the schrader in your design. I guess old habits die hard.

The diagram is one I posted
back in 2007, my idea was that someone would do the machining part beyond my facilities but I would save them work by making the endcap myself. I would still do it if I was making the hybrid cartridge as the shrader would be attached to the electrode and would therefore need to be insulated from the cartridge body.
As I said to LeMaudit earlier, I want the lathe/mill to compliment my adhesive based construction, not replace it
Posted: Fri May 20, 2011 7:32 pm
by evilvet
Hi JSR
Just to return to the subject of this thread for a moment

what sort of accuracy and repeatability do you want from your mill ? If you are intending to mill plastics and non-ferrous you could consider building your own router based mill. For something that can produce sub-millimetre accuracy on a 300mm x 300mm scale your total spend would be under $1000, probably closer to $500 depending on what you can source from scrap / recycle resources. With the right design you get a mill, profile cutter, engraver and high precision drill all in one.
My new build is budgeted at ~$3k but that is a 1200 x 600 cut bed with 0.025mm tolerances milling at 2000mm / minute.
Posted: Fri May 20, 2011 9:39 pm
by jor2daje
Making the burst disk holder the way you designed would be pretty easy, all i would do is is have a section after the male threaded portion that is smaller than your tap hole. This way you can just use a standard tap and the longer non threaded portion will seat on the burst disk before you reach the bottom of the threads.
If that didn't make sense I'll do a quick picture
Edit
Posted: Sat May 21, 2011 12:57 pm
by jackssmirkingrevenge
evilvet wrote:Just to return to the subject of this thread for a moment
what sort of accuracy and repeatability do you want from your mill ? If you are intending to mill plastics and non-ferrous you could consider building your own router based mill. For something that can produce sub-millimetre accuracy on a 300mm x 300mm scale your total spend would be under $1000, probably closer to $500 depending on what you can source from scrap / recycle resources. With the right design you get a mill, profile cutter, engraver and high precision drill all in one.
Sounds like it would be a fun project in its own right but I think I would rather fork out the cash for something I know will work and use as a means to an end.
I'm back in epoxyland but only to find my PC has been messed with, once I sort that out I will post some drawings of some "beginner" projects I would like to attempt and get a heads up on what is feasible and truly n00b level, as well as if there are alternative ways of going about the designs.
Posted: Sat May 21, 2011 1:26 pm
by Technician1002
jor2daje wrote:Making the burst disk holder the way you designed would be pretty easy, all i would do is is have a section after the male threaded portion that is smaller than your tap hole. This way you can just use a standard tap and the longer non threaded portion will seat on the burst disk before you reach the bottom of the threads.
If that didn't make sense I'll do a quick picture
Normal pipe threads are tapered so they become tight as they screw together. You can use a plug or bottoming tap to make the cap with even threads all the way to the bottom. Then the pipe can be threaded the same. This will permit screwing the pipe all the way in to the burst disk.
http://en.wikipedia.org/wiki/Tap_and_die
Bottoming tap or plug tap:[2] The tap illustrated in the top of the image has a continuous cutting edge with almost no taper — between 1 and 1.5 threads of taper is typical.[3] This feature enables a bottoming tap to cut threads to the bottom of a blind hole. A bottoming tap is usually used to cut threads in a hole that has already been partially threaded using one of the more tapered types of tap; the tapered end ("tap chamfer") of a bottoming tap is too short to successfully start into an unthreaded hole. In the US they are commonly known as bottoming taps, but in Australia and Britain they are also known as plug taps.
Posted: Sun May 22, 2011 4:18 am
by jackssmirkingrevenge
I drew up a pen gun design that I think would make a good first project. The light grey parts are aluminium, yellow are brass and green lines denoting an epoxy join (see!
)
The breech ring is a collar with o/d = chamber i/d and i/d = barrel o/d with a ring of ports drilled through it. while the piston is an aluminium "cup" with a rubber insert.
What say the gentlemen of the board, feasible for a first timer?
Posted: Sun May 22, 2011 4:24 am
by inonickname
You'll have more problems that you expect cutting those threads into a thin wall, and even more of a problem sealing them. For a first time project I'd omit the threads. The rest is easy.
Keep in mind it has to be made- that hole won't have a flat bottom, it's going to be tapered unless you find an endmill or counterbore about 150mm long in that diameter. Don't try make your walls too thin either.
Posted: Sun May 22, 2011 5:09 am
by Labtecpower
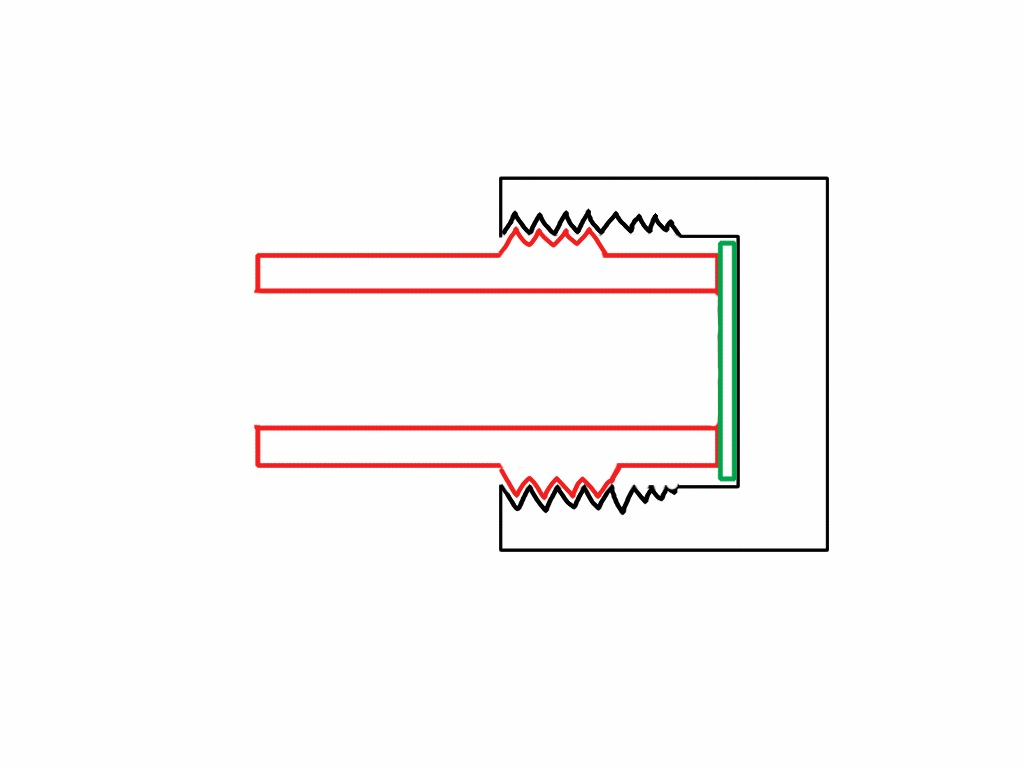
The threads would look more like this:

I would make it serviceable from the back, for easier piston reach. Also, keep in mind that the inside of the tube won't be very smooth, unless you ream it after drilling.
and, if you have access to a lathe, why not put a nice o-ring on the piston

Posted: Sun May 22, 2011 5:22 am
by inonickname
Yeah, the inside will be rough as guts. I'd find a moderately walled Al tube and work from there.
Posted: Sun May 22, 2011 5:26 am
by jackssmirkingrevenge
inonickname wrote:Yeah, the inside will be rough as guts. I'd find a moderately walled Al tube and work from there.
hmm... so it wouldn't be suitable to run the piston in, even with some polishing? Again, I'm completely new to this so forgive my abject ignorance...
why not put a nice o-ring on the piston
... because friction would probably outweigh the small benefits of sealing as opposed to just using a finely matched piston/chamber diameter.
I modified it slightly with a thicker threaded bit and the schrader part made separately and epoxied in. It's important to have it threaded, otherwise what's the benefit of using a lathe? edit: LeMaudit rightly pointed out that with the thread shown it would not be servicable anyway

Also here's a design for a hybrid cartridge using existing pipe instead of a completely machined body, in order to keep lathework to only the essential parts. The machined areas are shown in light grey, and I also intend to use the electrode design dewey-1 had suggested.
Posted: Sun May 22, 2011 6:16 am
by jrrdw
Jack, if you never cut threads on a lathe before you need some round stock to practice with. You also need to practice grinding/sharpening your tooling (cutters/bits).
A good ground cutter can make your work fun and easy. A bad ground cutter can waste a lot of material and time...
Posted: Sun May 22, 2011 6:36 am
by Brian the brain
A word of warning though...
after I got my lathe I started losing interest in spudding..
I think your first option would enable you to do what you do but easier and cleaner.
Getting a quality lathe and mill would enable you to do what you CAN'T do now..
A true step up.
About my loss of interest..I kinda feel like I've done it all...
Maybe it's the bikes though...
I hope to finish that time consuming project in a matter of weeks...
And then I need to get to work on a big..I mean BIG cannon for the chunking competition.
For those that are interested here's a new vid of the hardtailed bike..
Posted: Sun May 22, 2011 7:20 am
by jackssmirkingrevenge
jrrdw wrote:Jack, if you never cut threads on a lathe before you need some round stock to practice with.
Acknowledged, I don't expect to get it right first time
You also need to practice grinding/sharpening your tooling (cutters/bits).
Hadn't considered this aspect, any recommended reading I might encounter online?
Brian the brain wrote:A word of warning though...
after I got my lathe I started losing interest in spudding..
I can see what you mean, but I don't see that happening to me - I have enough pending projects for me to never feel that I've "done it all" - besides, nothing has ever been quite as a satisfying as making stuff go bang
I think your first option would enable you to do what you do but easier and cleaner.
Getting a quality lathe and mill would enable you to do what you CAN'T do now..
A true step up.
My thoughts exactly, if I'm going to part with what is not an inconsiderable sum of money, I want it to be a big step. Also these days I'm working on things that are beyond what epoxy can really take.
Posted: Sun May 22, 2011 7:38 am
by Heimo
jackssmirkingrevenge wrote:
Hadn't considered this aspect, any recommended reading I might encounter online?
I have a very old (out of copyright as far as I can tell) book that covers just about all you would ever want to know about every kind of machining operation that existed at the time it was written, I will see if I can scan some key pages to help get you started.... any subjects you are specifically interested in?
