First post, showcase/questions

Cannons powered by pneumatic pressure (compressed gas) using a valve or other release.
DIY4LYF
Private
Private
Posts: 3
Joined: Thu Jan 27, 2011 10:59 pm

Hey guys, first post and eager to learn!

In the last couple of months I have done a lot of tinkering with PVC cannons. The first I worked on was a simple inline combustion spud gun. It worked well, but I later learned it was quite a dangerous setup, especially since I wasn't even working with SCH 40 PVC :?

So then moved to youtube for inspiration... and got the idea for a piston valve rifle. It worked well but for some reason my pistons had a tenancy to SLAM back into their backstop and catastrophically fail resulting in a shotgun effect of hard plastic :scratch:

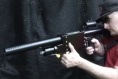
Here's a few pics I took of it and a short video of it working at ~50 PSI.

Image

Image


I think it came out fine, but I'm constantly replacing the piston and I want something more reliable.

~~~~~~~~~~~~~~~~~~~~~~~~~~~~~~~~~~~~~~~~~~~~~~~

FLASH FORWARD TO PRESENT!

I have just come across this site and it is full of awesome info!!

I have decided that I want to make a inline sprinkler valve rifle (or something similar).

I have already done my home work and downloaded "The Sprinkler Valve" PDF file that was uploaded by a helpful member here. Thanks!

Now my main concern was, how does the air flow get affected through the valve.... for example

If I had a 1" sprinkler valve going to say a 1/2" barrel will this increase velocity but decrease flow? In my small amount of physics knowledge that is the logical answer.

My next question is, if I have a larger tank say about 2x the volume of the barrel would this be beneficial in a one shot application? Or is a 1:1 ratio fine?

I have also had a go at the GGDT program, but with out the components in my hands, its quite hard to predict how well the system is going to work.

Last of all, any tips or links to a similar rifle with GOOD documentation? Most I have seen especially in the Showcase forum, has a lot of assumed knowledge written into it, so it makes researching / reverse engineering (in my head) harder to do.

Cheers guys!
User avatar
Lockednloaded
Staff Sergeant
Staff Sergeant
United States of America
Posts: 1566
Joined: Thu Sep 03, 2009 9:38 pm
Location: Texas, USA
Been thanked: 7 times

impressive that your first cannon is a piston valve. You say you always replace the piston, how is the piston accessed, I don't see any threads or bolts. Piston valves can be very consistent once you get a good piston built. I recommend getting your self a good bumper to keep it from catastrophically failing.
DIY4LYF
Private
Private
Posts: 3
Joined: Thu Jan 27, 2011 10:59 pm

Oh, I can see where the confusion is... These are construction pics before I glued it all together I replaced the barrel to T piece connection for a threaded connection, just in case I needed to change the piston... Which saved me building a new gun. I was thinking of placing an O-ring around the backstop, but not sure how much cushioning that will provide... given that it pretty much exploded on impact after 20 or so shots. I think the next thing I will try is a smaller pilot valve.... that should give less "suction" on the piston, resulting in a slower release, but will improve the longevity of the gun as a whole.
User avatar
jackssmirkingrevenge
Five Star General
Five Star General
Posts: 26219
Joined: Thu Mar 15, 2007 11:28 pm
Has thanked: 581 times
Been thanked: 347 times

DIY4LYF wrote:I have decided that I want to make a inline sprinkler valve rifle (or something similar).
You made a piston valve first now you want to make a sprinkler valve launcher? What a strange person.
If I had a 1" sprinkler valve going to say a 1/2" barrel will this increase velocity but decrease flow? In my small amount of physics knowledge that is the logical answer.


Ideally as a rough guide you should work with cross-sectional area, a 1" tube has an area of 0.785 in<sup>2</sup>, while a 1/2" tube has an area of 0.196 in<sup>2</sup> - so 75% less than the valve, this obviously creates a restriction but if you're firing 1/2" ammunition, it's perfectly fine. Performance suffers when your valve has less flow than the barrel, for example using a 1/2" valve with a 1 inch barrel.
My next question is, if I have a larger tank say about 2x the volume of the barrel would this be beneficial in a one shot application? Or is a 1:1 ratio fine?
It depends on the valve and pressure you're using, but in general 2:1 is overkill and the benefits of larger chambers are certainly not linear, if you play with GGDT it will be abundantly clear.
I have also had a go at the GGDT program, but with out the components in my hands, its quite hard to predict how well the system is going to work.
If you know the dimensions you want and the pressures you want to use, you can input a simplified model, say using a generic valve, and play with the parameters (pressure, barrel length, chamber volume etc.) and see how each parameter affects performance and to what extent.
Last of all, any tips or links to a similar rifle with GOOD documentation? Most I have seen especially in the Showcase forum, has a lot of assumed knowledge written into it, so it makes researching / reverse engineering (in my head) harder to do.
You've already made your own sprinkler valve so you've clearly got the basics covered, is there any specific query you have?

I think you'd be better off focusing on improving your piston valve. As already suggested, a good bumper will solve your piston problems - you might also want to limit piston travel, it doesn't need to move more than around 50% of the calibre for full performance, and the more you let it travel, the more speed it gains.

Another option would be to remove the second tee behind the piston and fit a spring, that will not only serve as a bumper but also allow you to fill from the chamber side, relocating the schrader to the chamber - assuming your piston isn't airtight. Incidentally, can we see your piston? you might have made it too heavy, which obviously increases the potential to damage the launcher.
I think the next thing I will try is a smaller pilot valve.... that should give less "suction" on the piston, resulting in a slower release, but will improve the longevity of the gun as a whole.
With some small improvements you can keep/increase performance without hurting the useful life of the launcher ;)
hectmarr wrote:You have to make many weapons, because this field is long and short life
User avatar
Technician1002
Captain
Captain
Posts: 5189
Joined: Sat Apr 04, 2009 11:10 am

The damage to pistons is often the result of not considering the distance the piston has to acceleration and then having a like deceleration zone

A car analogy would be acceleration using the torque of the engine for an eighth of a mile and then using a concrete barrier for brakes. How did you slow your piston back down? If it simply slams into a hard barrier, breakage is to be expected.

A proper bumper for the piston to deceleration into is often overlooked. This is a crucial part of any successful piston design.

In the photo below you can see the valve assembly from my first QDV cannon. It originally lacked a proper bumper and it ejected valves out the rear. Since I added a bumper about the same size as the piston, I have not had this problem since. This cannon is going on 10 years old. Last year I started using it at higher pressure with no problems.

Image

This first cannon was fired by pulling the rope.
DIY4LYF
Private
Private
Posts: 3
Joined: Thu Jan 27, 2011 10:59 pm

Ah, great advice.... except I can't remove anything without breaking it apart. I might how ever start again... it's only $20 in parts, if that... and I have all the metal components.

This is the only pic of the piston I have at the moment. This was the first piston I used.... I found the thin wall on the front of the piston broke off too easily, so I have made them considerably thicker.

Image

And I understand by reducing the movement now.... I see this is way too much and I will fix that in my next model. Check out how much it was moving...

Image

Image

@jackssmirkingrevenge I was under the impression that the rate of flow vs the time to open on a sprinkler valve was better than a piston valve.... I can tell by your comment I may be wrong :)

Either way, I think I will try this build again, next time with a much thicker front wall... to reduce travel and to beef it up a bit :P
User avatar
jackssmirkingrevenge
Five Star General
Five Star General
Posts: 26219
Joined: Thu Mar 15, 2007 11:28 pm
Has thanked: 581 times
Been thanked: 347 times

Definitely room for improvement, but kudos for making your own working piston cannon regardless, you hadn't found spudfiles yet so we forgive any small design imperfections :D
DIY4LYF wrote:I was under the impression that the rate of flow vs the time to open on a sprinkler valve was better than a piston valve.... I can tell by your comment I may be wrong :)
A sprinkler valve properly piloted certainly has good performance in terms of flow and opening time. My comment was referring to the fact that it's a bit of a "plug and play" unit which provides those making their first pneumatic with an easily fitted high performance valve, after which they usually move on to tackle a more advanced project which involves making the valve themselves.

In that regard, you've got things backwards :D but you jumped in the deep end and made something that works, so that's perfectly fine :)
hectmarr wrote:You have to make many weapons, because this field is long and short life
Post Reply

Create an account or sign in to join the discussion

You need to be a member in order to post a reply

Create an account

Not a member? register to join our community
Members can start their own topics & subscribe to topics
It’s free and only takes a minute

Register

Sign in

  • Similar Topics
    Replies
    Views
    Last post