Page 1 of 1
Next Generation Eclipse 40mm semi.
Posted: Tue Feb 21, 2012 12:43 am
by Solar
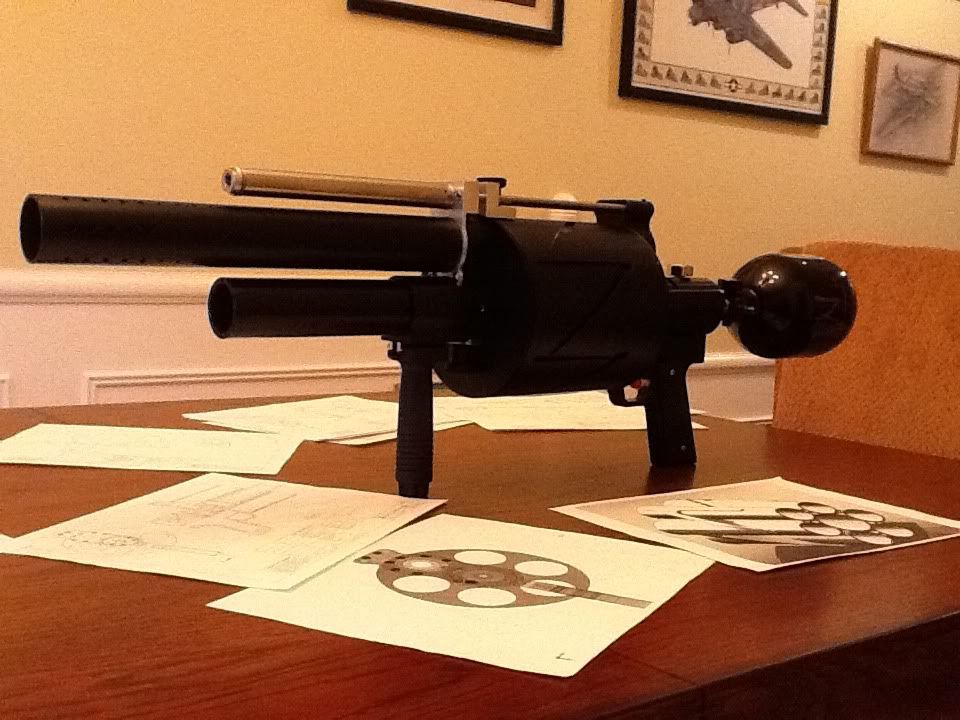
Here is the latest production prototype. New valve has over twice the flow rate of previous Eclipse and features a variable velocity choke.
Reloading is accomplished by a break forward breech. Cylinder is currently delrin, but will be replaced with aluminum and carbon fiber. There is a loading gate on the back disk for loading the next round adjacent to the chambered round. More pics and video in the next week.
Posted: Tue Feb 21, 2012 12:47 am
by JDP12
Sexiness.
Hows the zigzag style action working out?
http://en.wikipedia.org/wiki/Mauser_Zig-Zag
If you could post some details about that I'd be greatly interested to learn some more about it.
EDIT: wait.. is that an air cylinder I spy on the front of the rails?
Any particular way you designed the layout of the slots in the cylinder? As in proportionality and angles? The length of the straight slot, et cetera?
EDIT 2: I understand the idea of the zig zag action and how it works, the part i'm confused by is how it transfers from the straight section to the angled section. a simple straight back and forth makes sense until you have to transition. How does it "start" into the angled section, per se?
Posted: Tue Feb 21, 2012 12:58 am
by Solar
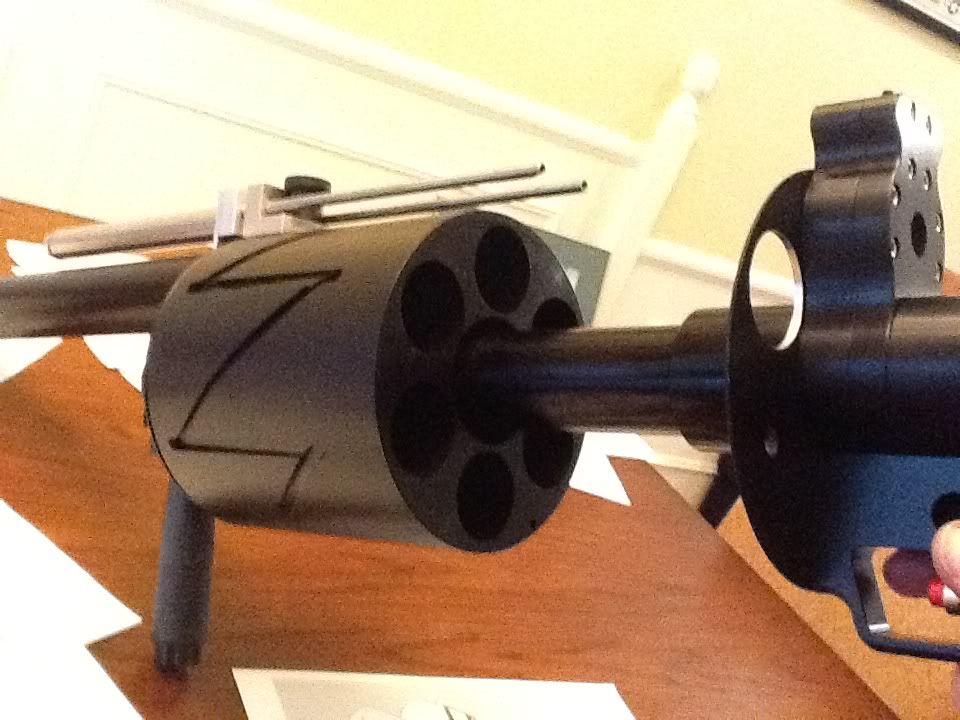
4 inch stroke on the piston gives a nice angle to index against at the 6" diameter cylinder size. We have a nice .250 pin that has very little play. The indexing works great. It is a very reliable system. Most likely it will be enclosed eventually. The air cylinder above the barrel receives air from the tubes that you see being used as slide rails. I still need to run longer tubes up to the front, so we are using a hose right now that is not shown.
The piston extends on fire, retracts on trigger release by spring force. This Mauser pattern works the best. The 30 and 30 degree action of the Webley fosberry has improper logic for our application.
Posted: Tue Feb 21, 2012 1:00 am
by JDP12
awesome, I love it. What angle is the mauser pattern that you are using, 45 degrees, or around there? I'd suppose it depends on cylinder diamter as well. also, second question:
I understand the idea of the zig zag action and how it works, the part i'm confused by is how it transfers from the straight section to the angled section. a simple straight back and forth makes sense until you have to transition. How does it "start" into the angled section, per se?
I put an arrow on both directions since I don't know which way you're rotating it.
Posted: Tue Feb 21, 2012 1:09 am
by Solar
The Mauser cylinder is cut different from this launcher due to the piston firing towards the rear and the clockwise movement of the launcher's cylinder.
The straight groove ramps up, then right before the end, falls off a ledge to the start of the angled groove. It is mostly level, but drops off a smaller ledge at the end of it's travel to prevent back feeding.
The pin has a spring keeping downward pressure on the pin.
I think it is around 45 degrees. The longer it is, the gentler. We might one day use a gradiated curve, but the zig zag works great.
Posted: Tue Feb 21, 2012 1:17 am
by JDP12
Hmm, so basically its something like this? this is an exaggerated view obviously. You're saying that it drops into a slightly different ledge.
I take it then that this small "dropped" ledge is the one thats truly inline with the cylinder?
Posted: Tue Feb 21, 2012 1:23 am
by Solar
Close... the ledge is angled compared to the line of travel. The straight groove is truly straight, but the pin falls off the ledge in the last bit of travel. Sorry I do not have any close up pics of this tonight or a drawing program on this machine.
You can see the shadow of the ledge on the cylinder.
Posted: Tue Feb 21, 2012 1:32 am
by JDP12
OK. still not quite able to picture this in my mind, would you mind either takin a close up picture or a diagram? If you dont want to disclose this to the public you can PM me, but i've tried to get a zigzag to work for awhile before giving up cuz i couldn't get it to work well, so I'm eager to see how you got it working successfully.
Posted: Tue Feb 21, 2012 1:37 am
by Solar
I will go into more detail soon when I get some more pics and video taken.
Posted: Tue Feb 21, 2012 1:38 am
by JDP12
Thanks! Can't wait, and nice job again, your eclipse models continue to blow me away.
Posted: Tue Feb 21, 2012 6:02 am
by Zeus
This was rather ironic I think.
Great work too, looking forwards to more details.
Posted: Thu Nov 08, 2012 2:47 pm
by GonzoInferno
Solar - Great design. Really refined. What diameter is the main air porting to the revolving cylinder? I understand you have an adjustable velocity, but how many shots are you getting out of the supply air (assuming an average or preferred setting)? I am building a 48mm semi. It will have a longer barrel also, hence more volume. So, my reason for asking is simply a baseline reference for my source air volume.
Posted: Fri Nov 09, 2012 1:38 am
by Solar
About 1 shot per cubic inch at 200psi from a 3000psi tank usi a 15 cubic inch ballast. Increasing the pressure and dropping the volume a bit on each sunsequent model. Runs great at about 250 in my opinion. Over 1 inch diameter. The tank pictured will probably put out 40 shots or more as it is a 4500 50ci tank.
Posted: Fri Nov 09, 2012 10:40 am
by GonzoInferno
Solar - Great info. Since I am scaled up a bit in size from your artwork, I was concerned I wouldn't have enough remote air storage. But now I have to do some more math. My chalk is wearing out.