EPR Build Log

A place for general potato gun questions and discussions.
User avatar
Davidvaini
Sergeant 4
Sergeant 4
Posts: 1315
Joined: Tue May 29, 2007 8:58 pm

Tue Jan 04, 2011 8:21 pm

PVC Arsenal 17 wrote: @Zeus: I was always turned off by electronics until I saw some really cool things done with them recently. Then I found Arduino and it really can't get any easier than this. Hopefully after I get this working more people here will want to try similar things. It's not too expensive and the possibilities are almost endless. I'm really tempted to put a small airsoft gun on my BOE Bot too.

I was turned off for a while too.. Im actually just getting into it, but I have seen some examples and it seems very simple...

you have some plug ins and some plug outs on this arduino... you can set up a simple switch to send power to the plugin..

so if you flip a switch, it sends power to a plugin.. you can hook up the arduino to your computer via USB and write a program that checks to see if power is coming in on that plugin...

if power is coming in on that plugin, you can send power out every 2 seconds out plug-out 3...

plug-out 3 sends power to led..

so every time that switch is turned on.. power is sent to that led that blinks every 2 seconds...

now thats really laymen terms as the plug in and plug outs are pins, but you get the idea..

the programming for it is really simple too..

the best part is the arduino is only $30... and has a bunch of pins including PWM pins! so the possibilites are endless.. home automation, circuit for a spudgun (my next project), etc...


for example here is a quick program I made real quick..

Code: Select all

int switchPin = 3;              // Momentary Switch connected to pin 3
int ledPin = 13;                 // LED connected to digital pin 13

void setup()
{
  pinMode(ledPin, OUTPUT);      // sets the digital pin as output
  pinMode(switchPin, INPUT); // sets the digital pin as the input
}

void loop()
{
   if(digitalRead(switch) == HIGH) { // if he switch has been turned on...

       digitalWrite(ledPin, HIGH);   // sets the LED on
       delay(1000);                  // waits for a second
       digitalWrite(ledPin, LOW);    // sets the LED off
       delay(1000);                  // waits for a second

   } // end of if statement

}// end of loop
Now I could make this code smaller by using a ternary operator, but I wrote it this way to show how easy the code is...

Loop runs constantly while the arduino is on...

so every millisecond, it runs whatever is inside loop untill whatever is inside the loop is finished, then the loop runs again.. the if statement is inside the loop.

so every millisecond it runs the loop to see if power is coming from the momentary switch.. if power is coming from the switch, it sends power out to an LED, once that is done, it runs whatever is inside the loop again... so if you repeat that process.. it basically means you hold the trigger down on the gun, and it fires once every second until you let go of the trigger (trigger is a momentary switch...)

it is that simple...

Up above outside of the loop is just declaring those pins and what they do essentially...
Last edited by Davidvaini on Tue Jan 04, 2011 8:56 pm, edited 1 time in total.
PVC Arsenal 17
Staff Sergeant 3
Staff Sergeant 3
Posts: 1762
Joined: Mon Mar 27, 2006 4:18 pm
Location: United States

Tue Jan 04, 2011 8:54 pm

Yeah that's basically it for a full-auto sketch. My sketch has the Arduino read a few different switches to determine what's going on and decide how to react, but it's still pretty basic. Semi-auto is a bit more tricky because you have store values and check for transitions so that the if() statement only runs once rather than again and again.
User avatar
Davidvaini
Sergeant 4
Sergeant 4
Posts: 1315
Joined: Tue May 29, 2007 8:58 pm

Tue Jan 04, 2011 8:59 pm

PVC Arsenal 17 wrote:Yeah that's basically it for a full-auto sketch. My sketch has the Arduino read a few different switches to determine what's going on and decide how to react, but it's still pretty basic. Semi-auto is a bit more tricky because you have store values and check for transitions so that the if() statement only runs once rather than again and again.
yep you can basically have a boolean value (true or false) be assigned.. so if you held down the trigger, and that boolean called readyToFire == true, it will fire and then set readyToFire = false, then you need an if statement to see if you let go of the switch, if you did, it would set ready to fire = true and you would essentially get semi auto..

its just stepping through the logic and what happens when you pull down the triger.. other than that its basically just checking to see if power is coming in or not..

and then just create different functions for each firing mode.. and just do a case statement to see which firing mode.. so if its firing mode full auto, you could call the full auto function.. which would do the necessary things to fire full auto..

the easiest way to have multiple different firing modes would be to have a button.. and in the code you would have a counter that sees how many times that button has been pressed.. so on 0 presses the mode is set to semi auto, on 1 press the mode is set to full auto, on 2 presses the mode is switched to 3 round burst, and on 3 presses, the counter is set back to 0 (semi-auto)

the cool thing is too. you could hook up a turn knob (potentiometer) very easily and control the rate of fire.. you could also control the ROF in the programming itself.. so its very powerful indeed.
PVC Arsenal 17
Staff Sergeant 3
Staff Sergeant 3
Posts: 1762
Joined: Mon Mar 27, 2006 4:18 pm
Location: United States

Tue Jan 04, 2011 9:24 pm

I worked out semi-auto sort of like this:

Code: Select all

void loop(){
  
  //Read and store value of trigger switch
  triggerstate = digitalRead(trigger);
  
//debounce delay
  delay(20);
  
  //If there is a transition from not pressed to pressed, Fire!
  if((triggerstate == HIGH) && (oldtriggerstate == LOW)){
    //do stuff
   }
  
  //If trigger is not pulled, do nothing.
  else{
    //do nothing
   }
   
   //store current value of trigger switch as old value
   oldtriggerstate = triggerstate;
}

And good thinking with the selector switch and a counter. Since I only planned to have semi and full auto, I can get away with a simple on/off switch but that's a great idea I'll have to consider if I want burst fire.
User avatar
Davidvaini
Sergeant 4
Sergeant 4
Posts: 1315
Joined: Tue May 29, 2007 8:58 pm

Tue Jan 04, 2011 9:32 pm

PVC Arsenal 17 wrote:I worked out semi-auto sort of like this:


And good thinking with the selector switch and a counter. Since I only planned to have semi and full auto, I can get away with a simple on/off switch but that's a great idea I'll have to consider if I want burst fire.
if you are going to show your code, can you show all of it, not just your loop?

I think the beginners or non-programmers would find it helpful.
PVC Arsenal 17
Staff Sergeant 3
Staff Sergeant 3
Posts: 1762
Joined: Mon Mar 27, 2006 4:18 pm
Location: United States

Tue Jan 04, 2011 9:46 pm

I've edited the simulation code a bit to remove the evidence of what makes this project unique, but here's the gist of it. The Arduino checks the state of the selector switch and then determines which path to take (semi or full auto). From there, it just relies on feedback from the trigger switch to operate the gun.

Code: Select all

/***Simulation Code***/


//Naming input pins
#define trigger 2
#define selector 7

//Naming output pins
#define secret_thing_one 10
#define secret_thing_two 11

//Declaring variables with start value of 0
int triggerstate = 0;
int oldtriggerstate = 0;
int selectorstate = 0;

void setup(){
  
  //Set input pins as inputs
  pinMode(trigger, INPUT);
  pinMode(selector, INPUT);
  
  //Set output pins as outputs
  pinMode(secret_thing_one, OUTPUT);
  pinMode(secret_thing_two, OUTPUT);
}

void loop(){
  
  //Read and store value of toggle selector switch
  selectorstate = digitalRead(selector);
  
  
  //Begin semi-auto loop
  if(selectorstate == HIGH){
  
  //Read and store value of trigger switch
  triggerstate = digitalRead(trigger);
  
  //debounce delay
  delay(100);
  
  //If there is a transition from not pressed to pressed, Fire!
  if((triggerstate == HIGH) && (oldtriggerstate == LOW)){
   //do secret stuff
   }
  
  //If trigger is not pulled, do nothing.
  else{
    analogWrite(secret_thing_one, 0);
    analogWrite(secret_thing_two, 0);
    }
  
  //store current value of trigger switch as old value
  oldtriggerstate = triggerstate;
  
  }


  //Begin full-auto loop
  else{
  
  //Read and store value of trigger switch
  triggerstate = digitalRead(trigger);
  
  //Debounce delay
  delay(100);
  
  //If trigger is pulled, Fire!
  if(triggerstate == HIGH){
  //do secret stuff
  }
  
  //If trigger is not pulled, do nothing.
  else{
    analogWrite(secret_thing_one, 0);
    analogWrite(secret_thing_two, 0);
    }
  }
}
  
User avatar
velocity3x
Corporal 4
Corporal 4
Posts: 828
Joined: Fri Jun 05, 2009 3:09 pm
Location: Yuma, Arizona
Contact:

Tue Jan 04, 2011 10:15 pm

@PVC Arsenal

Did you consider using a PLC's before deciding on Arduino? If so, what was the deciding factor(s) for choosing Arduino?
User avatar
Skywalker
Specialist
Specialist
United States of America
Posts: 194
Joined: Sun Aug 05, 2007 7:22 pm
Has thanked: 9 times
Been thanked: 9 times

Tue Jan 04, 2011 10:31 pm

Heh, I just bought an Arduino for my Dad for Christmas. They are pretty neat, but that's overkill for a simple select fire system. I wager I could put a select-fire together with at 555 timer and a few other components, and it would probably draw much less power and cost less. Of course, I'm sure Arsenal has something more interesting in mind that calls for some extra computational power.
PVC Arsenal 17
Staff Sergeant 3
Staff Sergeant 3
Posts: 1762
Joined: Mon Mar 27, 2006 4:18 pm
Location: United States

Tue Jan 04, 2011 11:32 pm

Arduino was attractive to me because it's so easy to learn and it gives me full control over what I want to do. Anything I have in mind can be implemented in the sketch with just a couple minutes at the computer, and there is plenty of info out there to help me if I get stuck.

I'm sure there are other routes, but for someone without much knowledge of electronics (me), Arduino makes it dead easy to do things. I just type up some simple code and it does exactly what I want it to do. I'm not relying on a circuit dedicated to performing one task. Eventually if I want to automate this gun, it's already capable. As it is now, what I want to do will require some fine tuning which would be a huge pain with a dedicated circuit. Modifying some code is far easier than fiddling with components to achieve the desired result.

$30 isn't all that bad for something with so much potential.
User avatar
Davidvaini
Sergeant 4
Sergeant 4
Posts: 1315
Joined: Tue May 29, 2007 8:58 pm

Wed Jan 05, 2011 2:39 am

PVC Arsenal 17 wrote:
$30 isn't all that bad for something with so much potential.
I agree 110%. The flexibility and modularity of the arduino at such a low cost is well worth it. you could take the arduino out of this project and use it in another project completely unrelated. $30 for that feature alone is worth it. Yes the Arduino is overkill on something like this, but I think the initial cost and maintainability is worth it. Good planning.
PVC Arsenal 17
Staff Sergeant 3
Staff Sergeant 3
Posts: 1762
Joined: Mon Mar 27, 2006 4:18 pm
Location: United States

Fri Jan 07, 2011 7:02 pm

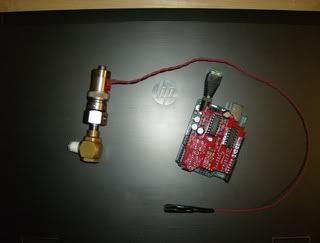
Some more parts got here sooner than expected...

Image
User avatar
Davidvaini
Sergeant 4
Sergeant 4
Posts: 1315
Joined: Tue May 29, 2007 8:58 pm

Fri Jan 07, 2011 11:23 pm

is that some sort of shield for the aruino?

man you are getting me excited about this project..
PVC Arsenal 17
Staff Sergeant 3
Staff Sergeant 3
Posts: 1762
Joined: Mon Mar 27, 2006 4:18 pm
Location: United States

Sat Jan 08, 2011 6:28 pm

Yes it is. It needs a boost to do this job.

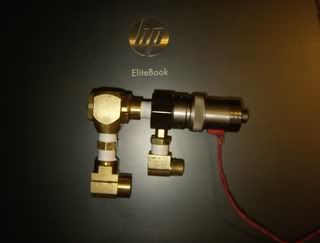
Here's some more stuff that should look familiar.

Image
User avatar
Davidvaini
Sergeant 4
Sergeant 4
Posts: 1315
Joined: Tue May 29, 2007 8:58 pm

Sat Jan 08, 2011 9:21 pm

what does the red shield do?

I myself am looking to make a very simple circuit to control a solenoid valve... but apparantly the amperage and voltage need is too high..

So I need a logic level mosfet, and a diode, but other than that I dont know how to wire it up.. (Im not skilled enough to understand diagrams yet)

(I just started electronics)

I basically need a diagram for dummies, as in a picture, saying this wire goes here.. lol
PVC Arsenal 17
Staff Sergeant 3
Staff Sergeant 3
Posts: 1762
Joined: Mon Mar 27, 2006 4:18 pm
Location: United States

Sat Jan 08, 2011 10:12 pm

Ah, I might as well say it then. The red part is a motor shield. It solves that problem. You can make one yourself easy enough but this shield lets you control two channels up to 1 amp each for only $11. What you see there is a solenoid, and the other channel will be used for something a little bit different. :lol:
Post Reply