Sealing face issues
-
Mr.Tallahassee

- Specialist 3

- Posts: 364
- Joined: Sun Jul 10, 2011 2:35 am
I finished a 1.5'' piston valve and I cannot get a seal and I have polished the face. I even adhered a rubber face to the barrel. 
-
Gun Freak

- Lieutenant 5

- Posts: 4971
- Joined: Mon Jan 25, 2010 4:38 pm
- Location: Florida
- Been thanked: 8 times
Pictures? It could be that the seat is not perpendicular to the piston.
OG Anti-Hybrid
One man's trash is a true Spudder's treasure!
Golf Ball Cannon "Superna" ■ M16 BBMG ■ Pengun ■ Hammer Valve Airsoft Sniper ■ High Pressure .22 Coax
Holy Shat!
One man's trash is a true Spudder's treasure!
Golf Ball Cannon "Superna" ■ M16 BBMG ■ Pengun ■ Hammer Valve Airsoft Sniper ■ High Pressure .22 Coax
Holy Shat!
-
daniel0663
- Specialist

- Posts: 131
- Joined: Wed Dec 15, 2010 10:57 pm
- Location: New Zealand
I also had this problem with my 1" valve, the problem was not the piston or the sealing face. But the problem was the piston travel, if your piston travels to far your piston housing wont be able to guide the piston straight to seal the sealing face.
If you are confidant that your pistons construction is well built and you have a 90 degree sealing face.
Try tweaking the piston housing or the sealing face closer to the piston so it will be able to seal, your piston travel shouldn't be to far or to close. But in the middle somewhere. So you get a good seal and good performing valve.
I may be wrong, but it worked for me.
-
Mr.Tallahassee
- Specialist 3
- Posts: 364
- Joined: Sun Jul 10, 2011 2:35 am
It wasn't at first, I had to re-cut the end of the pipe. I'll have pictures in about ten minutes. It's not visible to the naked eye whether or not its perfectly perpendicular.
-
Mr.Tallahassee
- Specialist 3
- Posts: 364
- Joined: Sun Jul 10, 2011 2:35 am
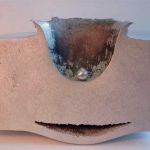
Pictures. I've greased the seat as well and the travel is show in the pictures.
- Attachments
-
-
-
-
-
-
MrCrowley

- Moderator

- Posts: 10078
- Joined: Fri Jun 23, 2006 10:42 pm
- Location: Auckland, New Zealand
- Been thanked: 3 times
Epoxy the bolt/nut and washer on the sealing face. Make sure to get epoxy in the nut threads, between sealing face and washer and between washer and nut. You may also want to put a washer behind the sealing face for support, epoxy that to the sealing face too. Pretty much epoxy everything except the sealing face area that needs to seal 
I'm sure that will solve your problems.
I'm sure that will solve your problems.
-
daniel0663
- Specialist
- Posts: 131
- Joined: Wed Dec 15, 2010 10:57 pm
- Location: New Zealand
Judging from the photos it all looks fine,
Have you tried moving the sealing face forward closer to the piston?
i recognized that the sealing face is near the half way of the T.
(if you can) try moving it closer and see if it seals.
If that doesn't work,
make sure you identify where exactly the leak is coming from.
You could be mistaken that the 'leak' may be coming from is the piston seal, but in fact the leak may be coming from the connection between the sealing face pipe and the PVC fitting in the last picture on the top right corner.
besides from that everything looks good.....
if that still doesn't work,
i would suggest you PM users that are more experienced in piston valve.
-
Mr.Tallahassee
- Specialist 3
- Posts: 364
- Joined: Sun Jul 10, 2011 2:35 am
I actually prevented the leak in the threaded portions using teflon pipe dope. its designed to seal high pressure fittings for both pvc and steel. I even used it on the rod. The sealing face is thoroughly glued to the washer. The only issue i have with epoxy on this valve is that i have to be able to move the face in order to remove the valve components. I've had to re-seat the o-rings six times. I'll try it though, might actually work.
-
MrCrowley
- Moderator
- Posts: 10078
- Joined: Fri Jun 23, 2006 10:42 pm
- Location: Auckland, New Zealand
- Been thanked: 3 times
If you can get it to leak at low pressure (>30PSI), remove the barrel and pour water on the piston face and you'll find the leak.
There could be a leak between washer and nut, even if the rubber is glued to the washer, it could leak past the inside diameter of the washer and out between the washer and nut.
There could be a leak between washer and nut, even if the rubber is glued to the washer, it could leak past the inside diameter of the washer and out between the washer and nut.
-
Mr.Tallahassee
- Specialist 3
- Posts: 364
- Joined: Sun Jul 10, 2011 2:35 am
It leaks at any pressure which makes it difficult. It's a fast leak. I'll try that though.
-
Technician1002

- Captain

- Posts: 5189
- Joined: Sat Apr 04, 2009 11:10 am
Any time I cut a barrel for a piston valve, I stand the barrel on end on a sheet of plywood that has a piece of sandpaper glued on it. I rotate the barrel while it is standing on end and look for any wobble as it rotates. If I can see any leaning, I use the sandpaper to sand off the high side until the barrel has no wobble as it is rotated standing on end. Once the barrel is true, the face of the piston can be tested against the end of the barrel for a proper fit. With a small amount of valve grinding compound, the piston face and the barrel can be lapped together.
-
Mr.Tallahassee
- Specialist 3
- Posts: 364
- Joined: Sun Jul 10, 2011 2:35 am
That's exactly what I did originally. Took a whole day but it still leaked badly. I finally broke down and adhered rubber to the pipe surface. It worked numerous times last night but wouldn't get past 20psi. Now it won't hold ANY air hardly.
-
Gippeto

- First Sergeant 3


- Posts: 2506
- Joined: Sat Jan 19, 2008 10:14 am
- Location: Soon to be socialist shit hole.
- Has thanked: 2 times
- Been thanked: 17 times
Suggestion:
Replace the rubber sealing face of the piston with peel and stick sandpaper.
Color the sealing end of the barrel with a black sharpie marker.
Insert the piston until it contacts the barrel.
Give the piston a couple rotations.
Remove piston.
Have a look at the end of the barrel. Any low spots will still have ink on them. If you find low spots...sand using the piston...and do the test again. Repeat until you're done.
Failing that....it's leaking at the all thread/washer...use silicone for low pressure applications...and let it cure over night.
"It could be that the purpose of your life is to serve as a warning to others" – unknown
Liberalism is a mental disorder, reality is it's cure.
Liberalism is a mental disorder, reality is it's cure.
-
Mr.Tallahassee
- Specialist 3
- Posts: 364
- Joined: Sun Jul 10, 2011 2:35 am
Gippeto- The sealing face and barrel end are BOTH rubber surfaces.
-
Gippeto
- First Sergeant 3
- Posts: 2506
- Joined: Sat Jan 19, 2008 10:14 am
- Location: Soon to be socialist shit hole.
- Has thanked: 2 times
- Been thanked: 17 times
Doesn't matter if you've got rubber on both surfaces....if the surfaces aren't square with one another...it's not going to seal.
The method I suggested will ENSURE that the barrel face and sealing face of the piston are square to one another when installed.
The method I suggested will ENSURE that the barrel face and sealing face of the piston are square to one another when installed.
"It could be that the purpose of your life is to serve as a warning to others" – unknown
Liberalism is a mental disorder, reality is it's cure.
Liberalism is a mental disorder, reality is it's cure.
Create an account or sign in to join the discussion
You need to be a member in order to post a reply
Create an account
Not a member? register to join our community
Members can start their own topics & subscribe to topics
It’s free and only takes a minute
Sign in
-
- Similar Topics
- Replies
- Views
- Last post
-
- 11 Replies
- 4598 Views
-
Last post by qwerty
-
- 3 Replies
- 2021 Views
-
Last post by c19o
-
- 5 Replies
- 2818 Views
-
Last post by saefroch
-
- 3 Replies
- 1845 Views
-
Last post by deusXmachina
-
- 2 Replies
- 2122 Views
-
Last post by sgort87